macOS · Ableton Live 11 & 12
StitchAble User Manual
Your finished songs → one gapless, show-ready setlist. Everything the app does, and why.
Section 01
Getting started
StitchAble is a macOS app that stitches your individual worship and band songs into a single, gapless Ableton Live set, ready for playback. It works with MultiTracks downloads and with songs you have already built in Ableton, and it can output for Live 11 or Live 12.
The whole point is to get you from a folder of songs to a playable set in about a minute. Here is the short path.
- Install it. Open the DMG, drag StitchAble into Applications, and launch it. A guide voice and the click sounds install themselves on first launch, so there is no setup step.
- Direct StitchAble at your songs. It scans and lists what it finds, reading each song's title, artist, key, BPM, and time signature from the best-named folder, or from the
.als filename.
- Drag songs into the running order on the right, in the order you will play them, or double-click one to add it to the end. Reorder any time by dragging. To take a song out, swipe it right to left and tap Remove, or swipe all the way across.
- Set each song's options: a transpose if you need a key change, and the transition into the previous song.
- Preview a transition with the play button to hear the seam before you commit.
- Review, then Build. The Set Up window shows the returns, the control lanes and the transitions the set will have, and Build sits right under them. Tick Project folder in the footer for a full Ableton project rather than a single set file. Out comes one Live set that opens natively in your chosen version of Live.
- Change your mind with the set open in Ableton. Press Live and edit it in place. See StitchAble Live.
What your songs can look like
As of 1.0.3 the scan is far more forgiving, so you do not have to reorganize anything to get started.
StitchAble finds your songs whether each one is:
- a song folder with an Ableton project inside, the standard layout;
- a single song folder you choose on its own;
- a loose
.als file; or
- a flat folder of
.als files, one per song.
Key, BPM, and time signature are read from the best-named folder, and failing that from the
.als filename. If you choose a folder with no Ableton projects in it at all, StitchAble now
says so, "No Ableton projects (.als) found," rather than showing you an empty list and leaving you to
guess.
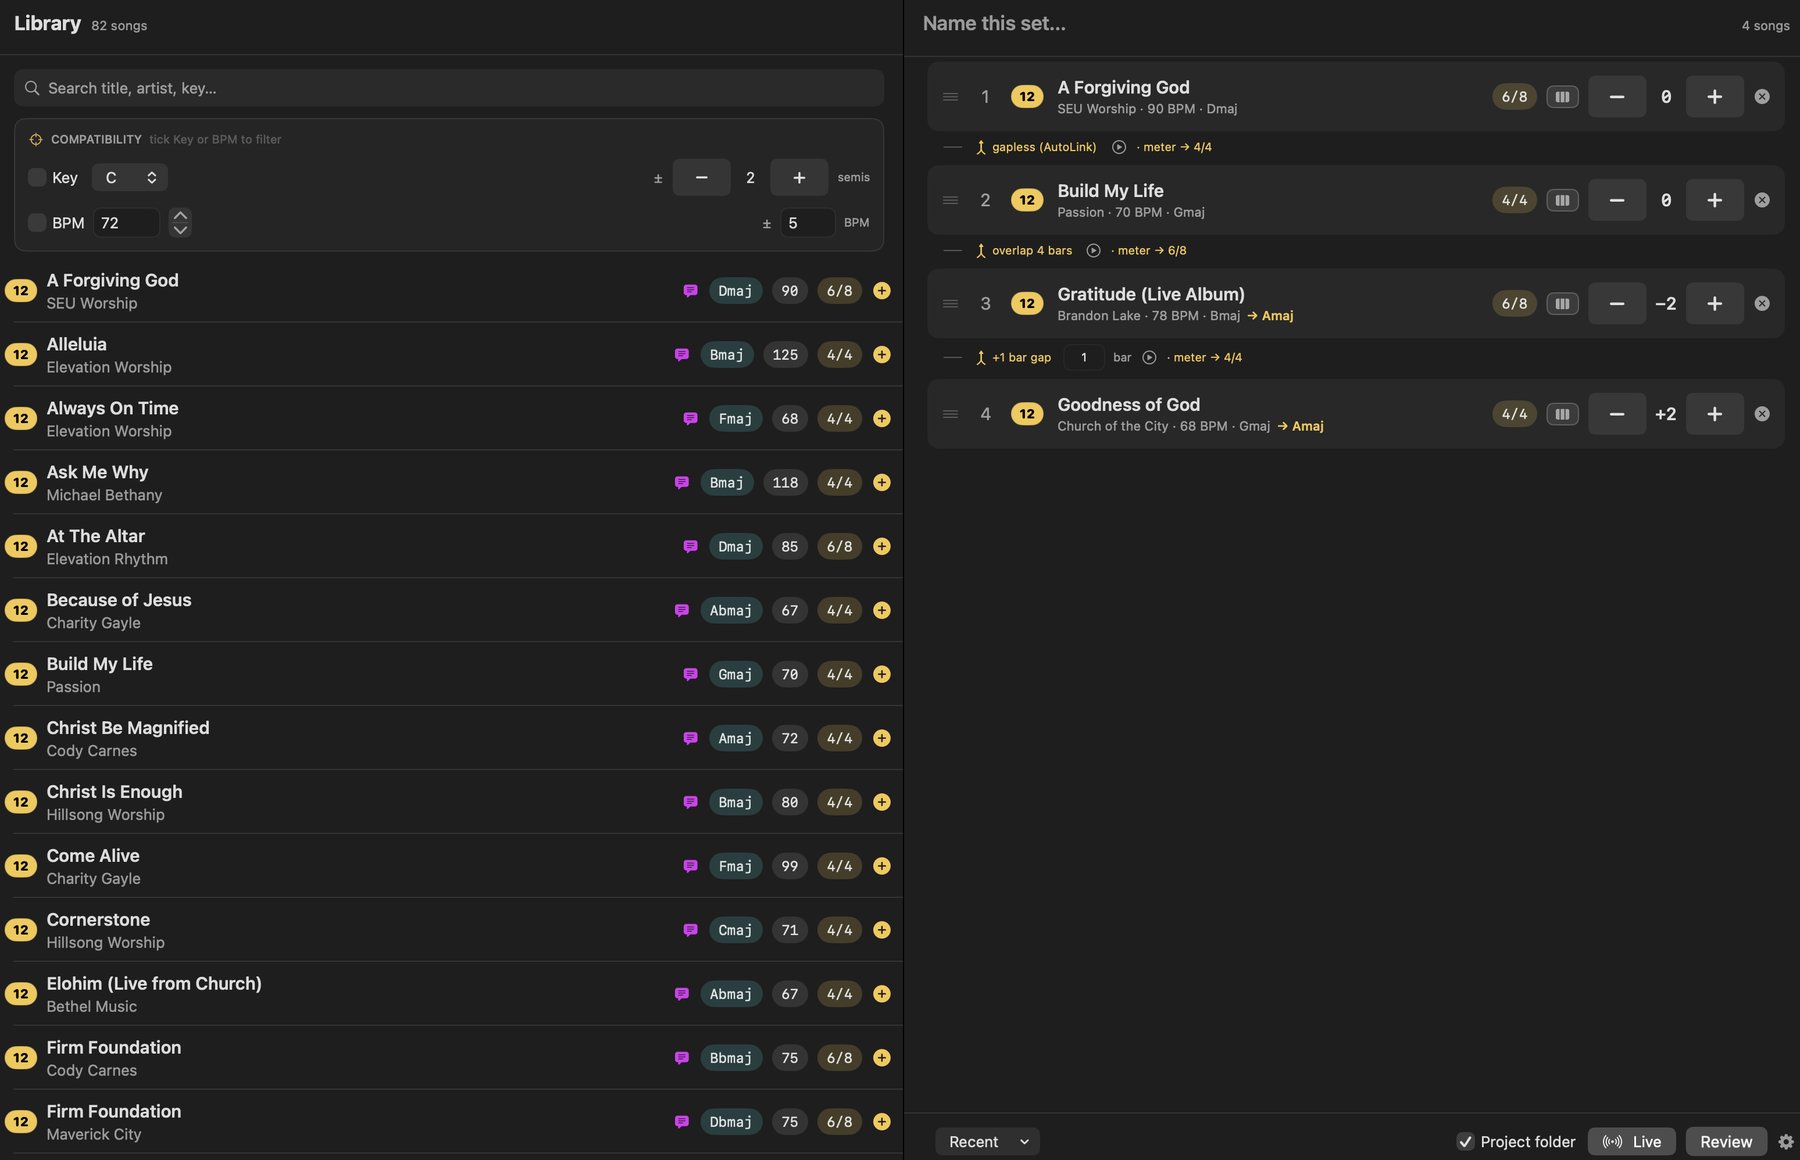 The StitchAble window: your library on the left, the running order on the right, Live and Review in the footer.
 Your library after scanning, with title, artist, BPM, key, and time signature read from each song's folder.
 Hit Build when your order is ready.
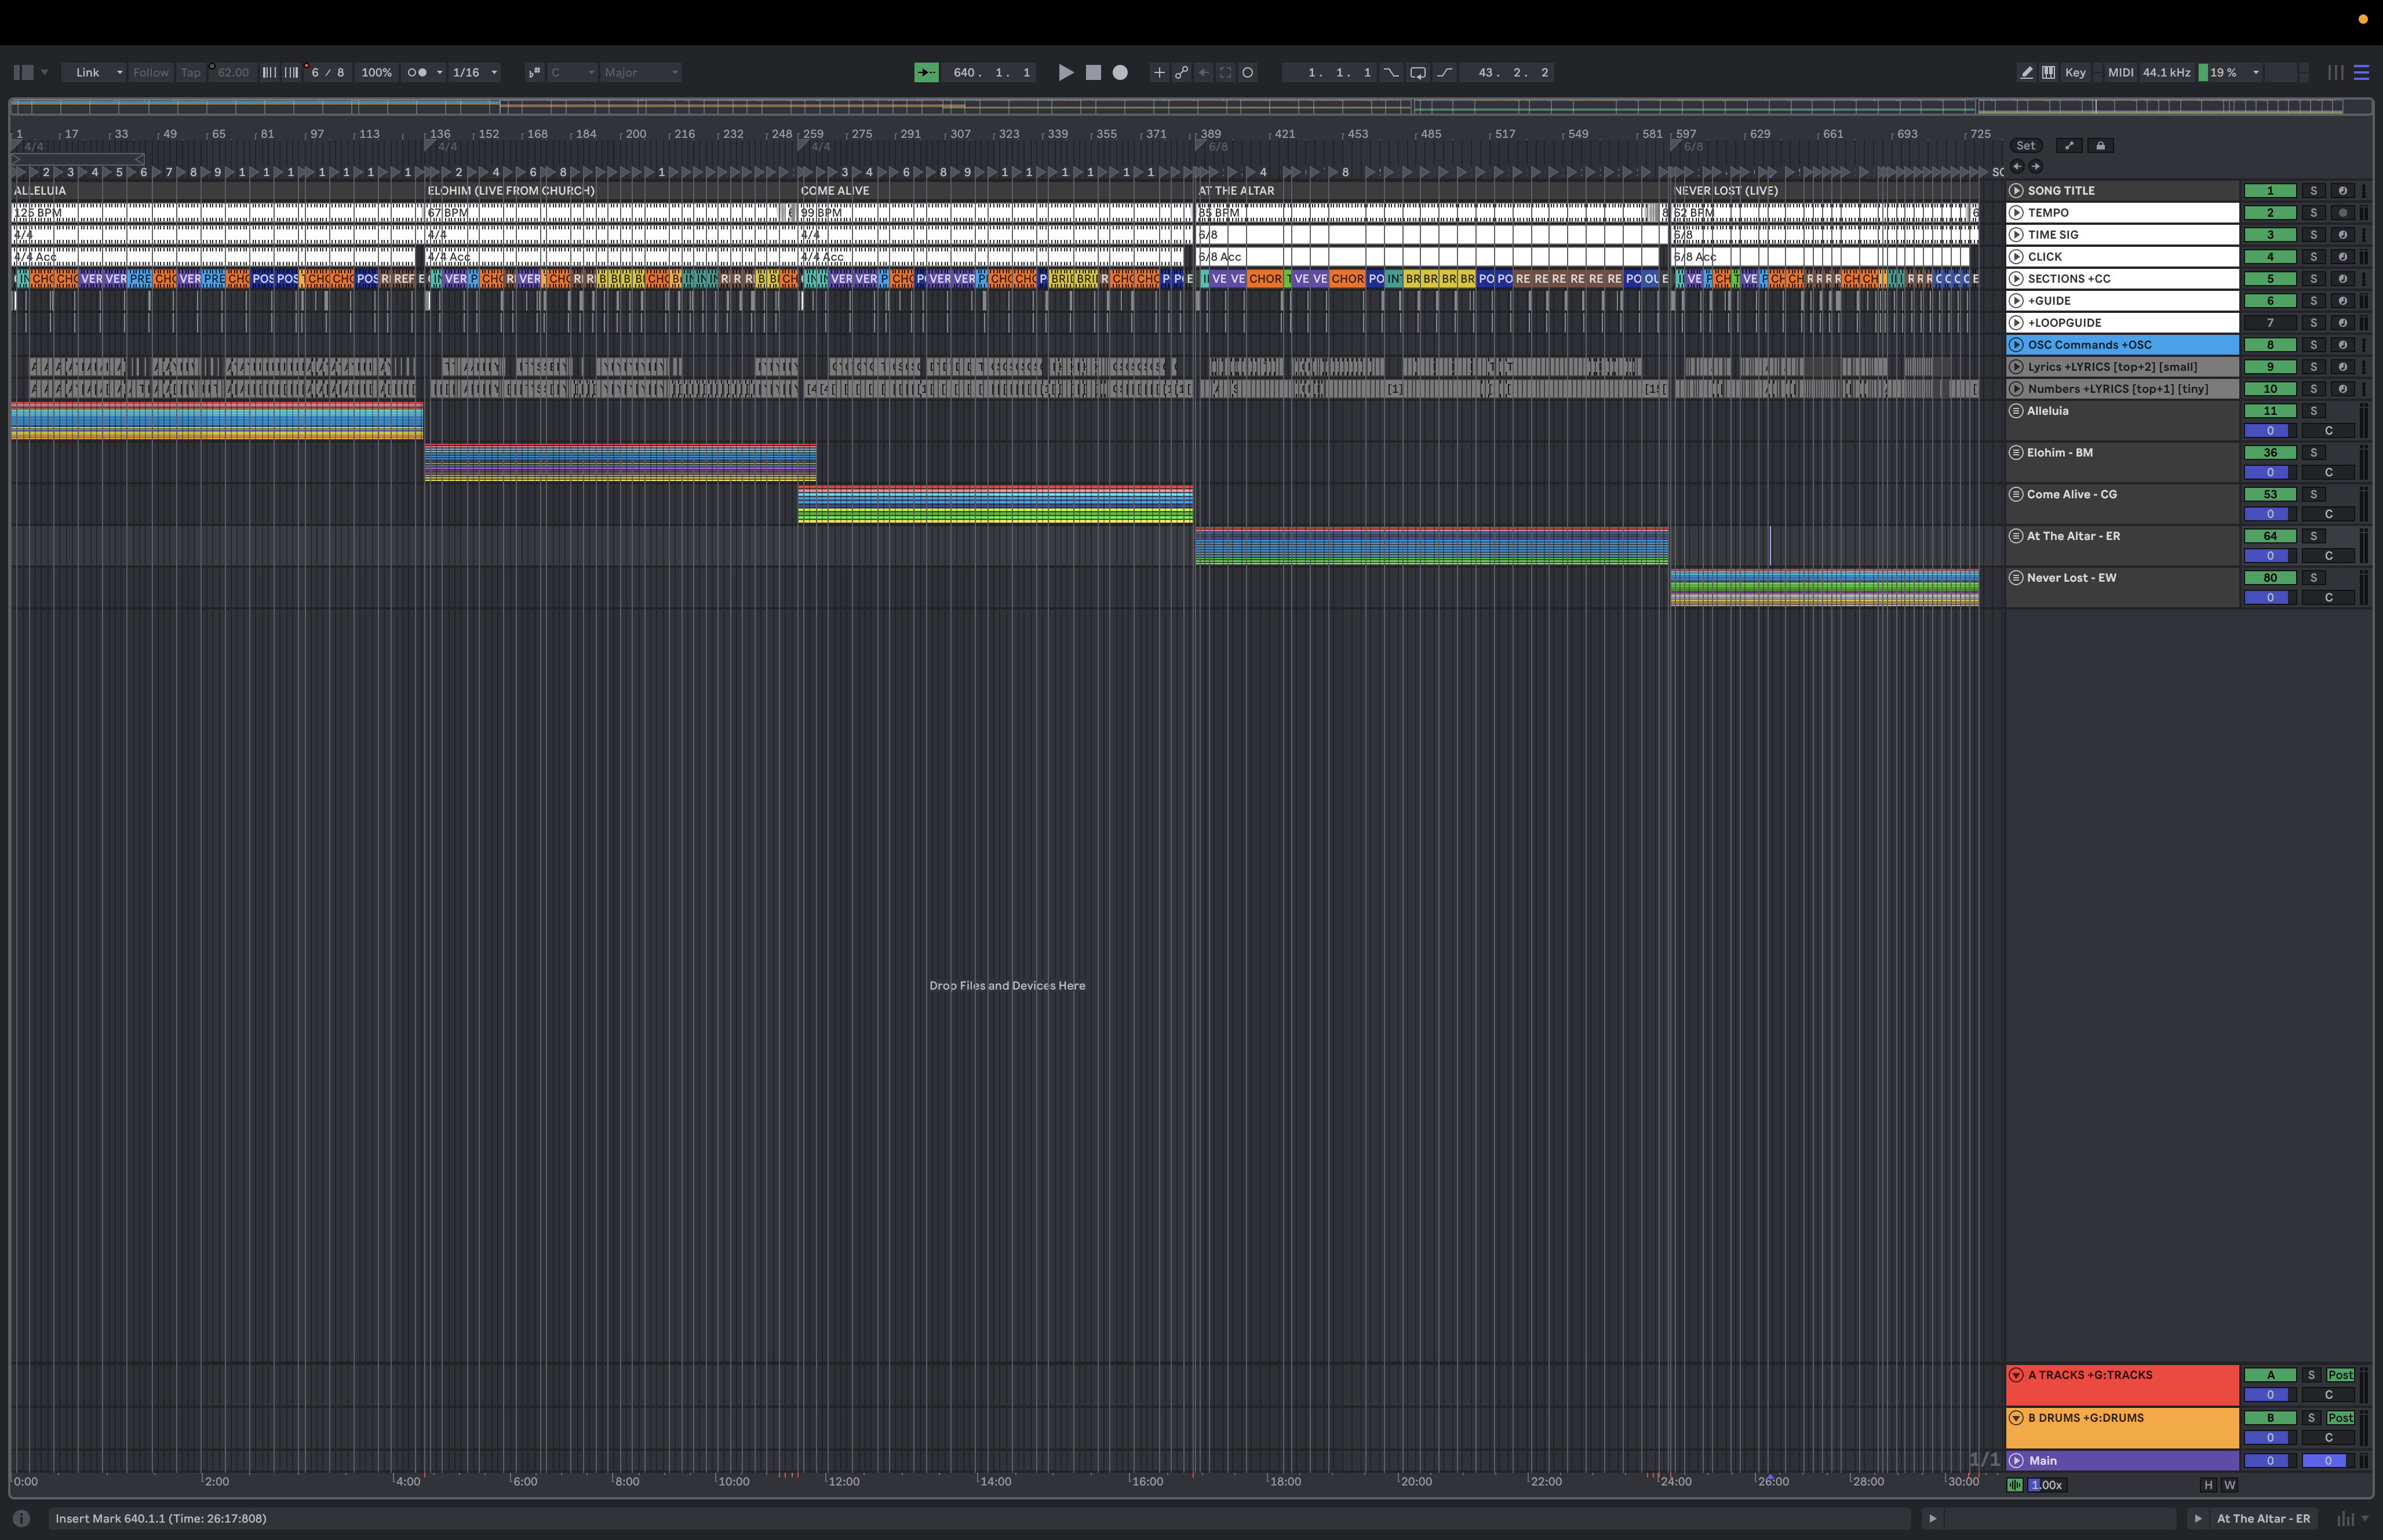 The result: your whole set merged end to end, open natively in Ableton Live.
Why it works this way. StitchAble reads everything it needs from your folder structure, so there is nothing to tag or import by hand. Name your folders well once, and the app does the rest every week. It never modifies your original songs.
Section 02
The running order
Your set lives in the running order. Each song is a row, and between every two songs sits a transition control.
A song row shows its number, title, artist with BPM and key, a time-signature pill, a transpose stepper with the resulting key, and a remove button. Drag rows to reorder them, and hold a row near the top or bottom of the list to scroll while you drag.
 One row: number, Live 12 badge, title, artist with BPM and key, the meter pill, the sections button, the transpose stepper and the remove button. Under it, the join into the next song.
Setting a key by hand
When a song's name does not carry its key, the row lets you set one yourself, new in 1.0.3. Do that and
the key display and transpose-to-key both work for that song like any other.
Finding the next song
The search box above the library matches title, artist and key. Under it sits the Compatibility box, which is how you find what can follow the song you just placed. Tick Key, pick a key, and the library regroups around it: what is already in key, and beside it what sits just below and just above, with the exact distance on every row and a ± tolerance in semitones you set. Tap a song in the lower or higher group and it lands in the running order already transposed into key. Tick BPM as well, with a target and a tolerance, and you are down to the songs that fit both.
Tags, and how a name is read
A song named the AbleSet way, with tags in its name like Cadenas #Canibal #Rock, shows those tags in light blue after its title, in the library, Add song and the running order. Tags from a BuildAble song's card show on their own line under the artist. The Tags menu beside each search box shows only the songs carrying every tag you tick, and the search matches tags too. In a built set, a song's title keeps the tags in its name; card tags stay off the stage.
AbleSet's square brackets work the same way. A color like Diecinueve [fuchsia] shows as a dot in that color after the title, and a duration like [3:20], [nosong] or a class like [.bold] stays out of the title too. Any other bracket, like Song [Live], is part of the title. They're not tags, so Tags in song titles leaves them alone: when a song's name gives the set its title, they go with it. A song with its own title locator keeps that locator just as it is.
You can also pick a song's color with the dot on BuildAble's Song tab. StitchAble shows that color the same way and carries it into your sets, and it wins over a color in the file name.
Tags in song titles, on the Track Lanes page of Set Up, is on by default. Off, every song title in the set leaves its #tags out, even a song whose own title carries them, and a BuildAble song whose card says so leaves them out either way. With Song name lane matches the title on in Settings, each song's SONG TITLE lane follows its title. Live mode matches songs whichever way you choose. New in 1.4.2.
For a song named by hand, a spaced dash splits the title from the artist: Goodness Of God - Bethel. A hyphen inside a word stays in the title, so Coldplay Mash-Up is one title. Folders BuildAble names, the ones with | in them, read the way they always have.
Why: everything about a song, its place in the set, its key, and how it joins its neighbors, is visible and adjustable from the row itself. No digging through menus.
Section 03
Arranging a song
Every song in the running order has a section editor on its row: the song's own waveform, one card per section, in the order the set will play them. Change the order and the set is built that way. The song itself is never touched.
- Click the sections button on a song's row. It opens over the waveform, with the song as built.
- Drag a card to move a section. Click the
+ between two cards to add a section from the song's map, or to repeat one. Click a card's − to drop it.
- Build. The set carries the song in that order.
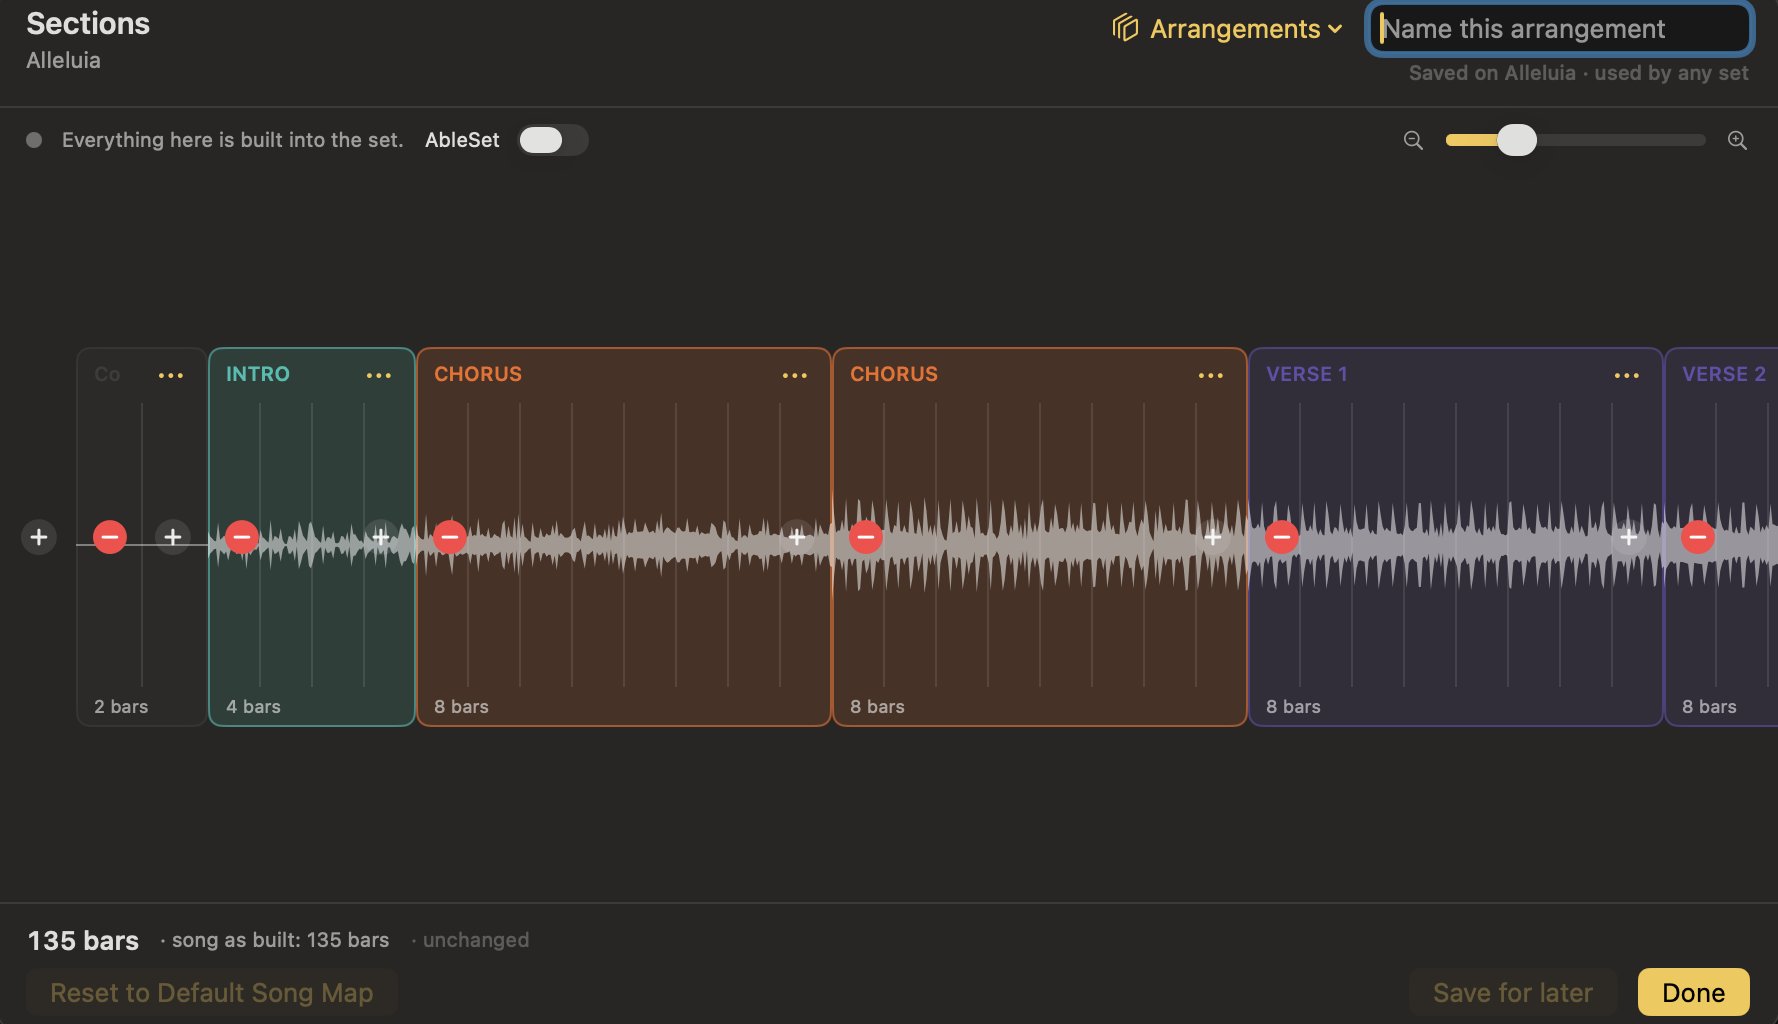 The section editor over Alleluia: one card per section, the song as built, the AbleSet switch and the arrangements menu up top.
What a card can do
- Loop in AbleSet. The loop button on a card sets an AbleSet loop:
+LOOP until you move on, or +LOOP:N for a count. The audio is not duplicated; AbleSet repeats the section when it gets there.
- Trim. Take bars off the head or the tail. The card shows what the cut will remove before you apply it.
- Count it in. A section can replay the song's own count-in ahead of it, useful when it now opens the song.
- Rename. An instance can play under a different section name. The names on offer are the ones the song's guide can actually say, so the spoken cue always matches what the timeline shows.
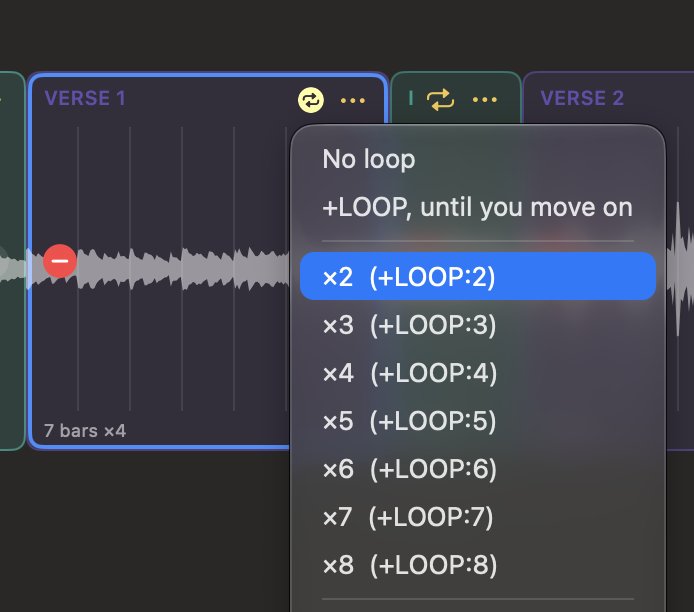 The loop menu on a card: +LOOP until you move on, or a count.
What a cut takes with it
A section owns the bar leading into it, where its spoken name and the cues describing it sit, and its own audio. It does not own its final bar, which announces whatever comes next. So when you move a section its callout comes along, and the section it now follows keeps announcing it correctly. The count belongs to the front of the song and stays there. Lyrics follow AbleSet's rule: a line that straddles a boundary goes with the section that holds most of it.
Crossfades where the audio is spliced
Wherever the rebuilt song joins two stretches of audio that were not next to each other in the original, a cut, a repeat, a reorder, a small round marker sits on the seam between the two cards. Lit means the seam crossfades, grey means a hard edit. Click it to set that seam: on or off, and how many beats before and after the boundary. The section you land on plays at full level from its downbeat either way; before is how far ahead of it the outgoing audio starts fading, after is how far past it the outgoing audio keeps sounding, still fading, under the new section. New seams start at an eighth of a beat before and one beat after.
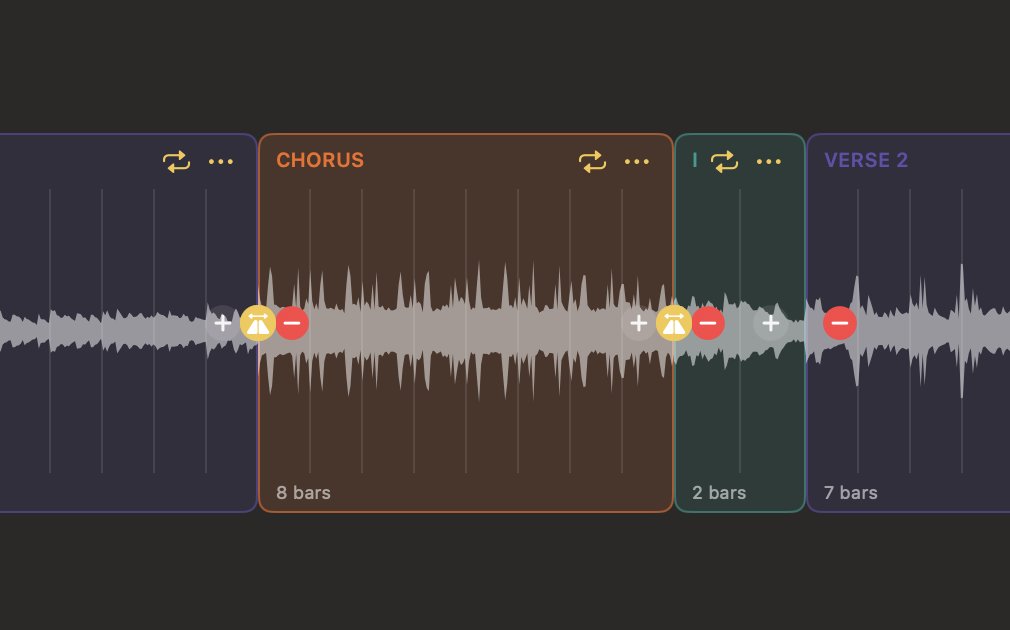 A reorder: the round markers sit on the seams the build splices.
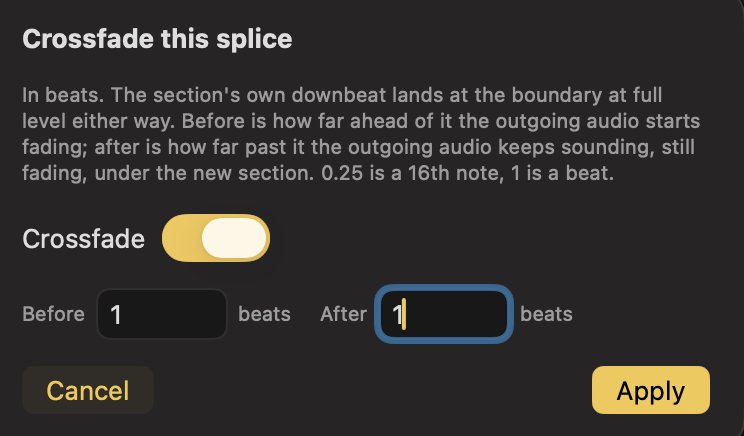 A seam's settings: before and after the boundary, in beats.
Saved arrangements
Name an arrangement and save it and it lives on the song, not on this set, so it is there for every set that uses the song, and in BuildAble's Song Library too. Load one from the menu at the top of the editor. Reset to Default Song Map puts the song back as built.
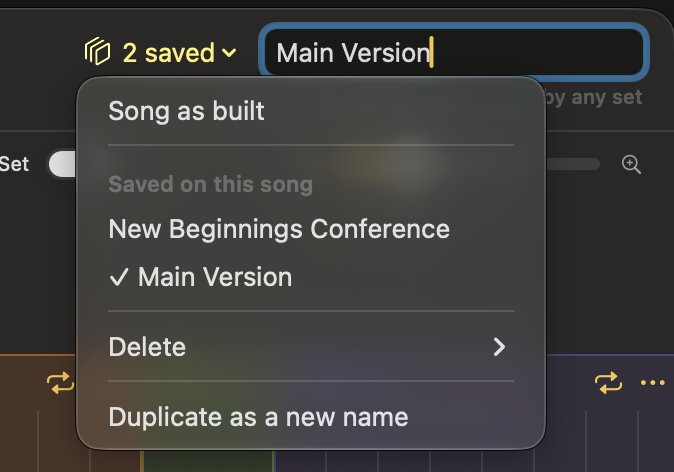 The arrangements menu: the song as built, the arrangements saved on this song, delete and duplicate.
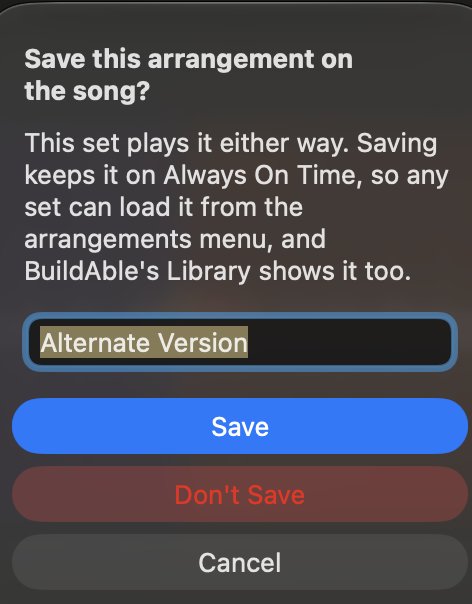 Press Done on an arrangement you haven't saved and it offers to keep it on the song.
The AbleSet switch, and click loops
Everything you do to an arrangement is really built into the set: a reorder moves the audio, a repeat plays it twice, a trim cuts it, and the seams get their crossfades. AbleSet, the switch above the timeline, hands two things to AbleSet for this arrangement: skips and loops. Off, a section you drop is really cut, and there are no loops: the loop button leaves the cards, because a loop is AbleSet's. To play a section twice without it, add it again with the +. On, a dropped section stays in the set right where it was with +SKIP on it, AbleSet passes over it, the guide's callout in the bar before it is changed to say what actually comes next, and you can bring it back live without a rebuild. The loop button on a card sets +LOOP or +LOOP:N. The choice is saved with the arrangement, so a set picks it up with it.
A kept skip gets a round marker too, on the section after it. AbleSet jumps over the skipped section, and the marker sets how the tracks fade out before the jump and back in after it, in beats. A fade is built into the set, so a skip with its fade on takes Build & Reapply, and so does bringing back a skip that was built with fades. Turn the marker off and a skip goes to Live right away as a hard jump.
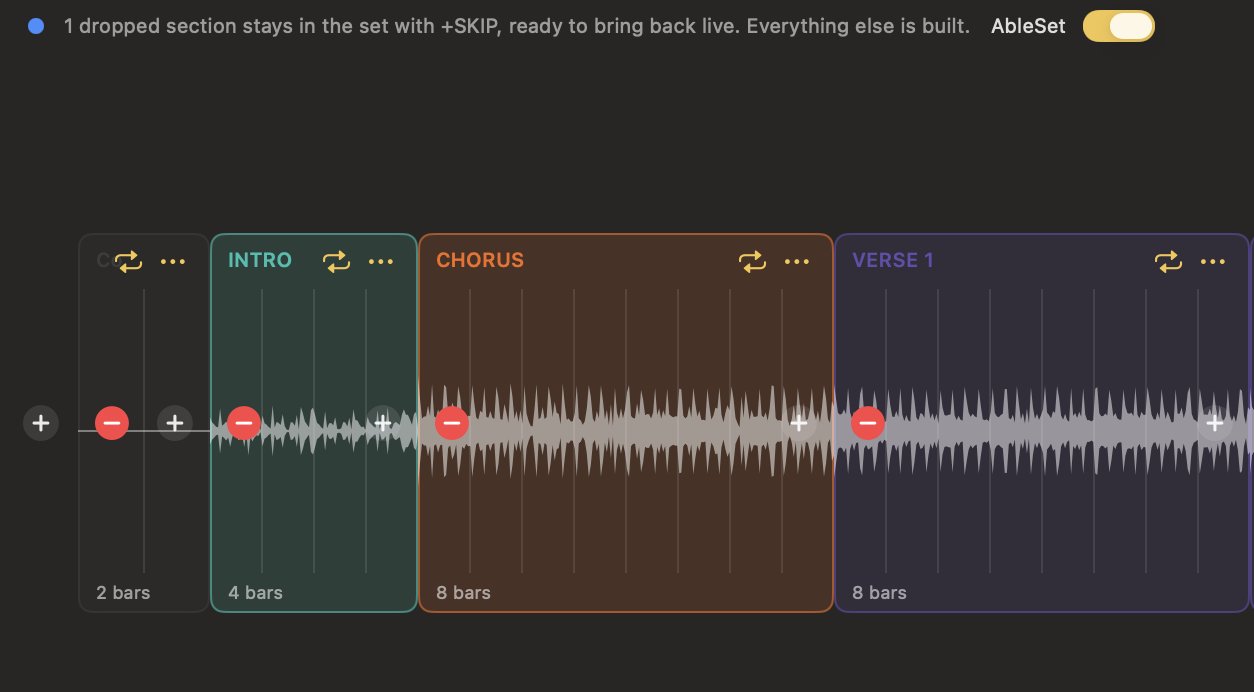 AbleSet on and one section dropped: it stays in the set with +SKIP, ready to bring back live.
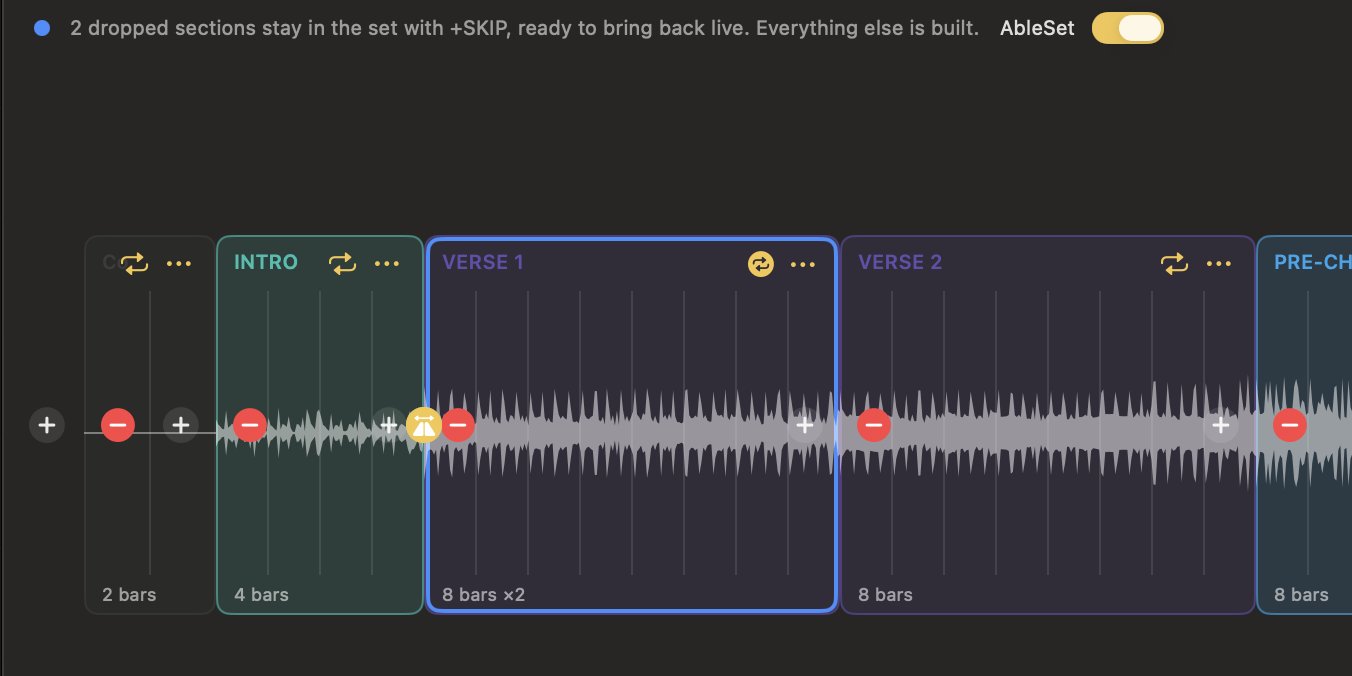 Two skips kept and VERSE 1 looped twice, with the blue ring.
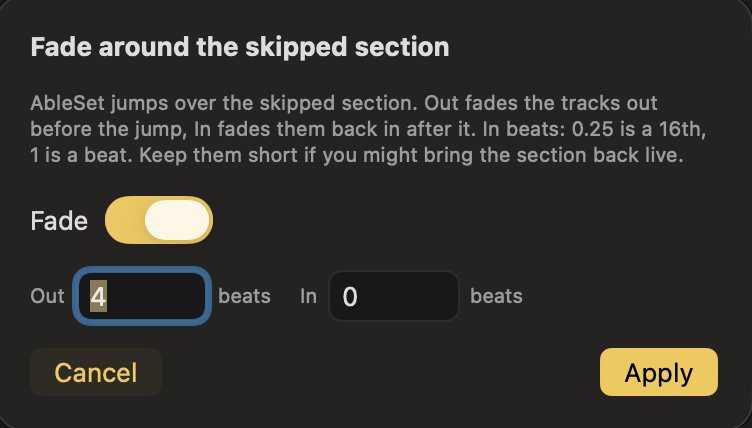 The marker on the section after a skip: the fades around AbleSet's jump.
The dot beside the switch is blue when AbleSet is keeping a dropped section for you and grey when the build is doing everything itself, and looped cards wear a blue ring. Click loop, at the bottom of the list the + opens, adds a bar that isn't in the song at all: click and tempo with no tracks under it, named LOOP and, with AbleSet on, holding on +LOOP until you move on, for the space between songs or under a talk. It starts as a copy of the bar before it, and its menu sets it up like a little song of its own: a tempo, a time signature, and a count-in of one or two bars before it that isn't looped, counted out loud by the guide into the loop. Set the next song's tempo and meter and the band can lock in before it starts. A click loop is empty space with a click in it: no tracks, no guide callout, no lyric line, and the callout for the section after it is spoken in the bar before the loop. The tracks fade out as they run up to it and fade back in when you leave it, and the round marker on the seam into the loop sets both, in beats. A click loop is always built in.
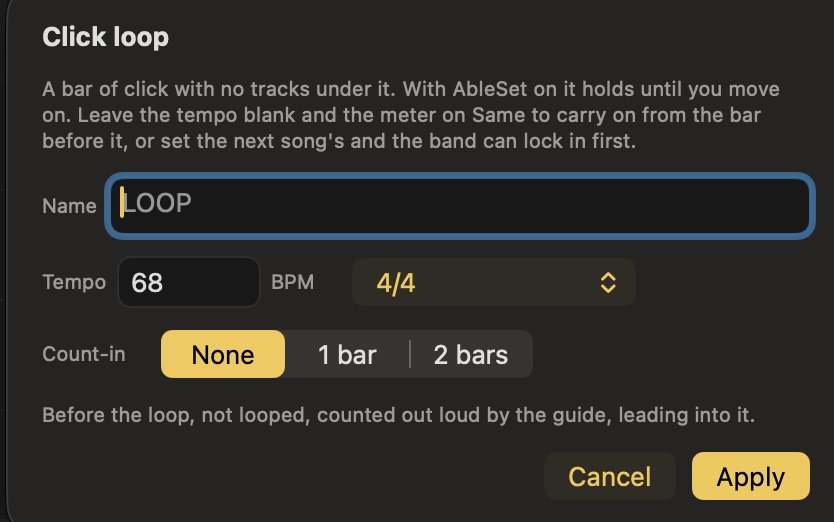 A click loop's card: a name, a tempo, a meter, and a count-in of one or two bars before it.
The running order has it too, as a card of its own. Add song, right under the last song, opens your library with a search of its own: click a song to add it to the end, as many as you like, and Click loop at the top of that list adds a click loop card. Add all, beside Done, adds every song listed that isn't in the running order yet, so search or tick some tags first to add just those. It's a row like any song: number it, drag it anywhere, remove it with its x. Type a name on the card, WELCOME or PRAYER or whatever it's for, and Edit… sets its tempo, time signature and count-in. The name is what shows on the timeline and in AbleSet. It joins the song before it with a gap or gapless, and the song after it joins it the same way; those are the only two joins a click loop has, since it has no bars to overlap. In the built set it's a song of its own: its own title locator and SONG TITLE clip, a COUNT-IN section if you asked for one, a LOOP +LOOP section, its own SONG END, and no tracks under any of it. It borrows the click, tempo and time signature lanes from the song beside it. It adds no group or track of its own, on any layout: the set's tracks and groups just run through it as dead air, and only the click, tempo, time signature and sections play. A set that's only click loops works too. With no song to borrow from, the click is made for each loop's tempo and time signature, and the set is built on a template, yours if you've chosen one, otherwise the Set template.
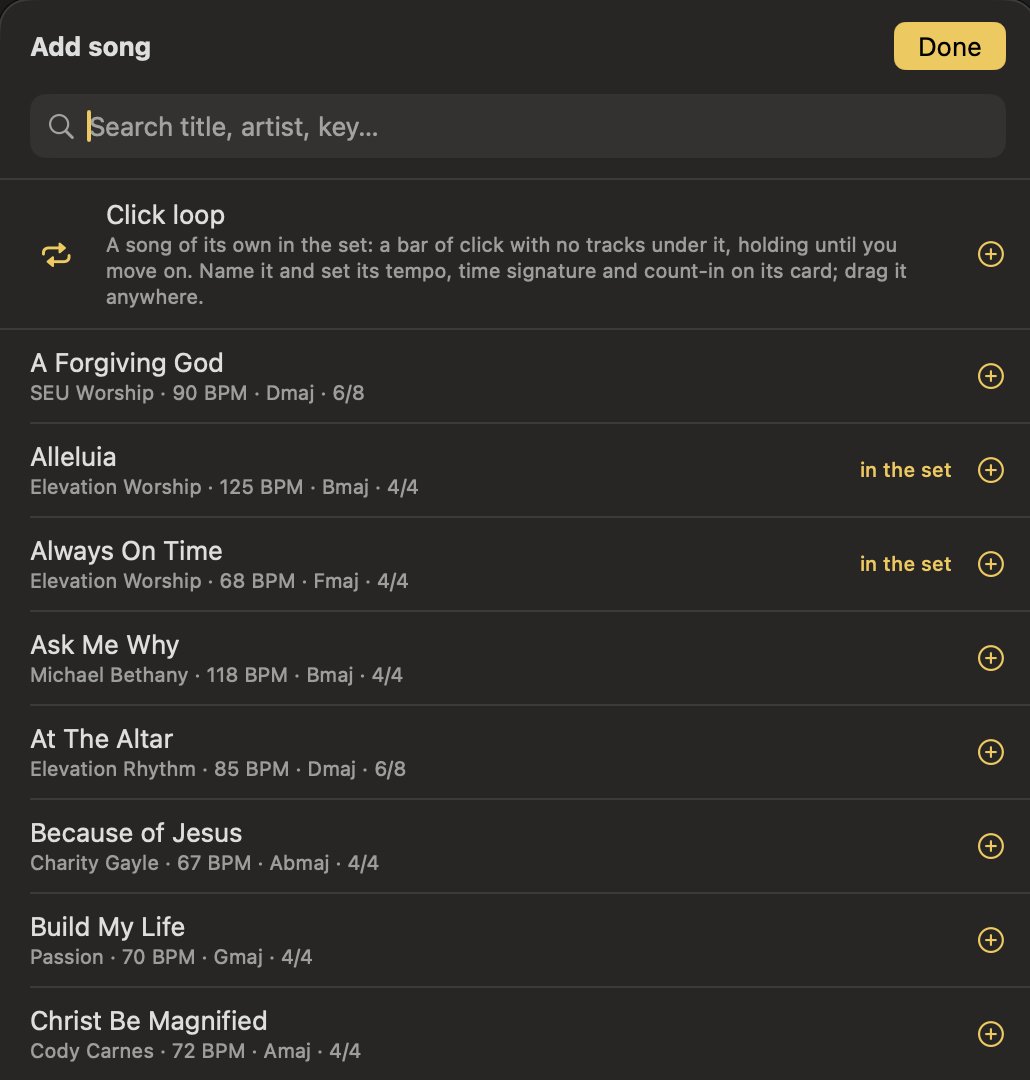 Add song opens your library with a search of its own; Click loop sits at the top of the list.
 A click loop in the running order: a row like any song, a bar of gap on each side.
A click loop can carry a Key and Lyrics too, both in its Edit… sheet. The key shows on AbleSet with the loop's name, the way a song's key does. For lyrics, pick a song and an Arrangement, and that song's whole lyrics land on the loop in that order, or Import a Chart…; each section's name is in bold, spelled out. When an arrangement ends on a click loop, the loop's menu has Show the Rest of the Lyrics Here: every section after the loop that doesn't play, in one clip across it, a line each, so AbleSet still shows them. New in 1.4.0.
In Live mode the same editor works on the open set. See StitchAble Live: skips and loops reach AbleSet without a rebuild.
Why the song is never changed: an arrangement is built on a song, not into it. Your song stays exactly as BuildAble made it, and next week's set can arrange it differently.
Section 04
Song transitions
The control between two songs sets how the next song joins the previous one. Click it to choose.
- Gap: an N-bar gap between the songs. Every song joins with the default from Settings, Layout, Gap between songs, 1 bar out of the box. Change the default and every join still on the old one follows; a join you changed by hand keeps its own.
- Gapless (AutoLink): the next song starts exactly where the previous song ends.
- Overlap by N bars: the next song starts N bars before the previous song ends, so they overlap. Pick Overlap and type the bar count beside the menu, any number, the same way the gap's is typed. The count is measured in the outgoing song's bars, so a 2-bar overlap means the previous song's last two bars play underneath the incoming song. Both songs play through the overlap at their own natural tempo, and nothing is time-stretched.
If the two songs use different time signatures, the boundary notes the meter change.
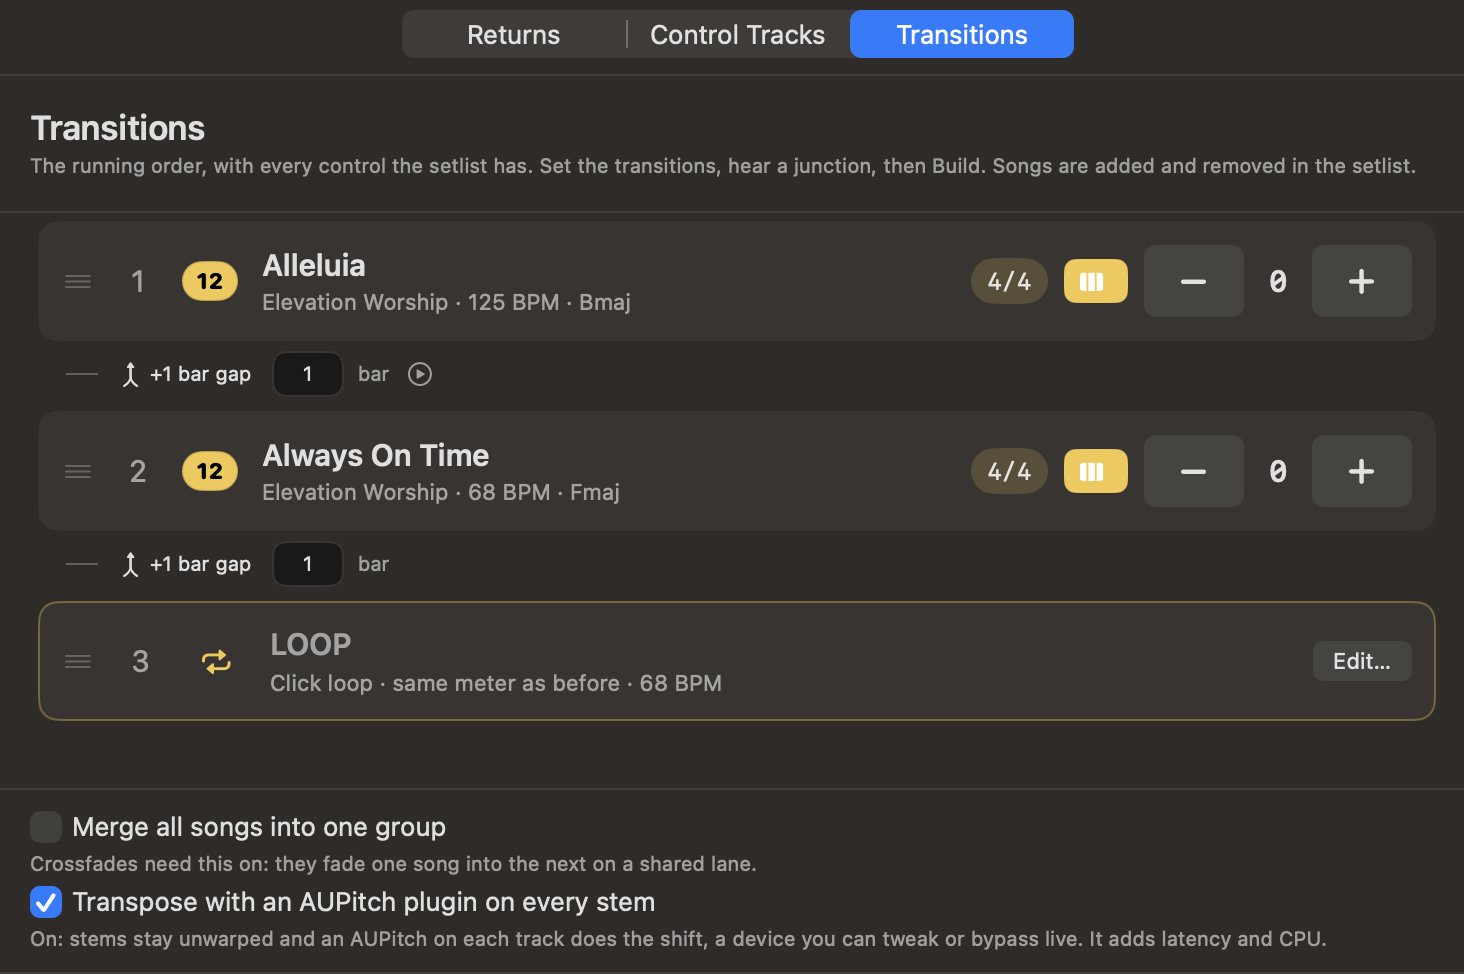 The Transitions page in Review: every join in the set in one place, a preview button on each, and the AUPitch option at the bottom.
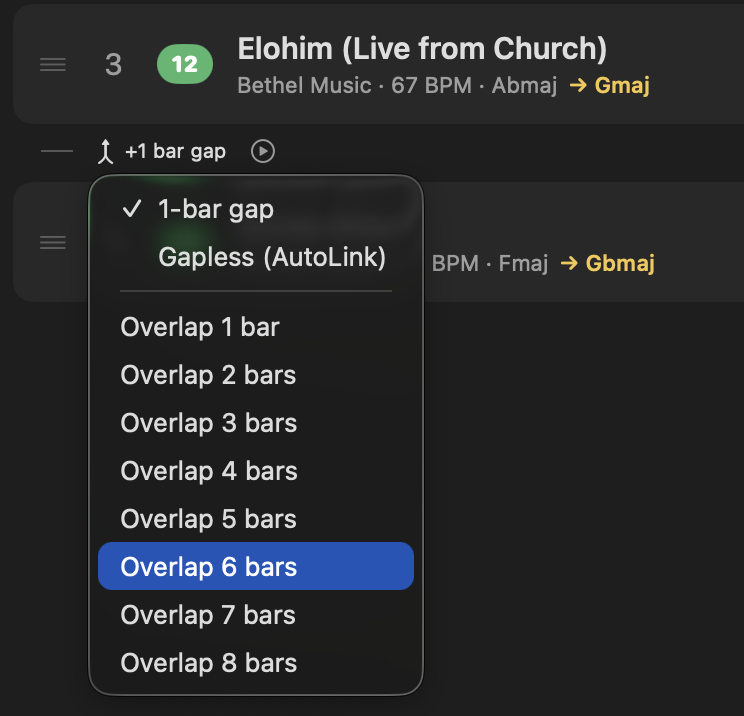 The transition control, showing the choice between a gap, gapless, and an overlap.
 Gapless (AutoLink): the next song begins the instant the previous one ends.
 An overlap, set here in the outgoing song's bars.
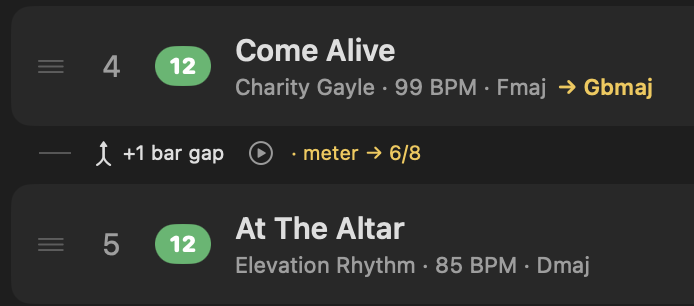 When two songs differ in meter, the boundary marks the time-signature change.
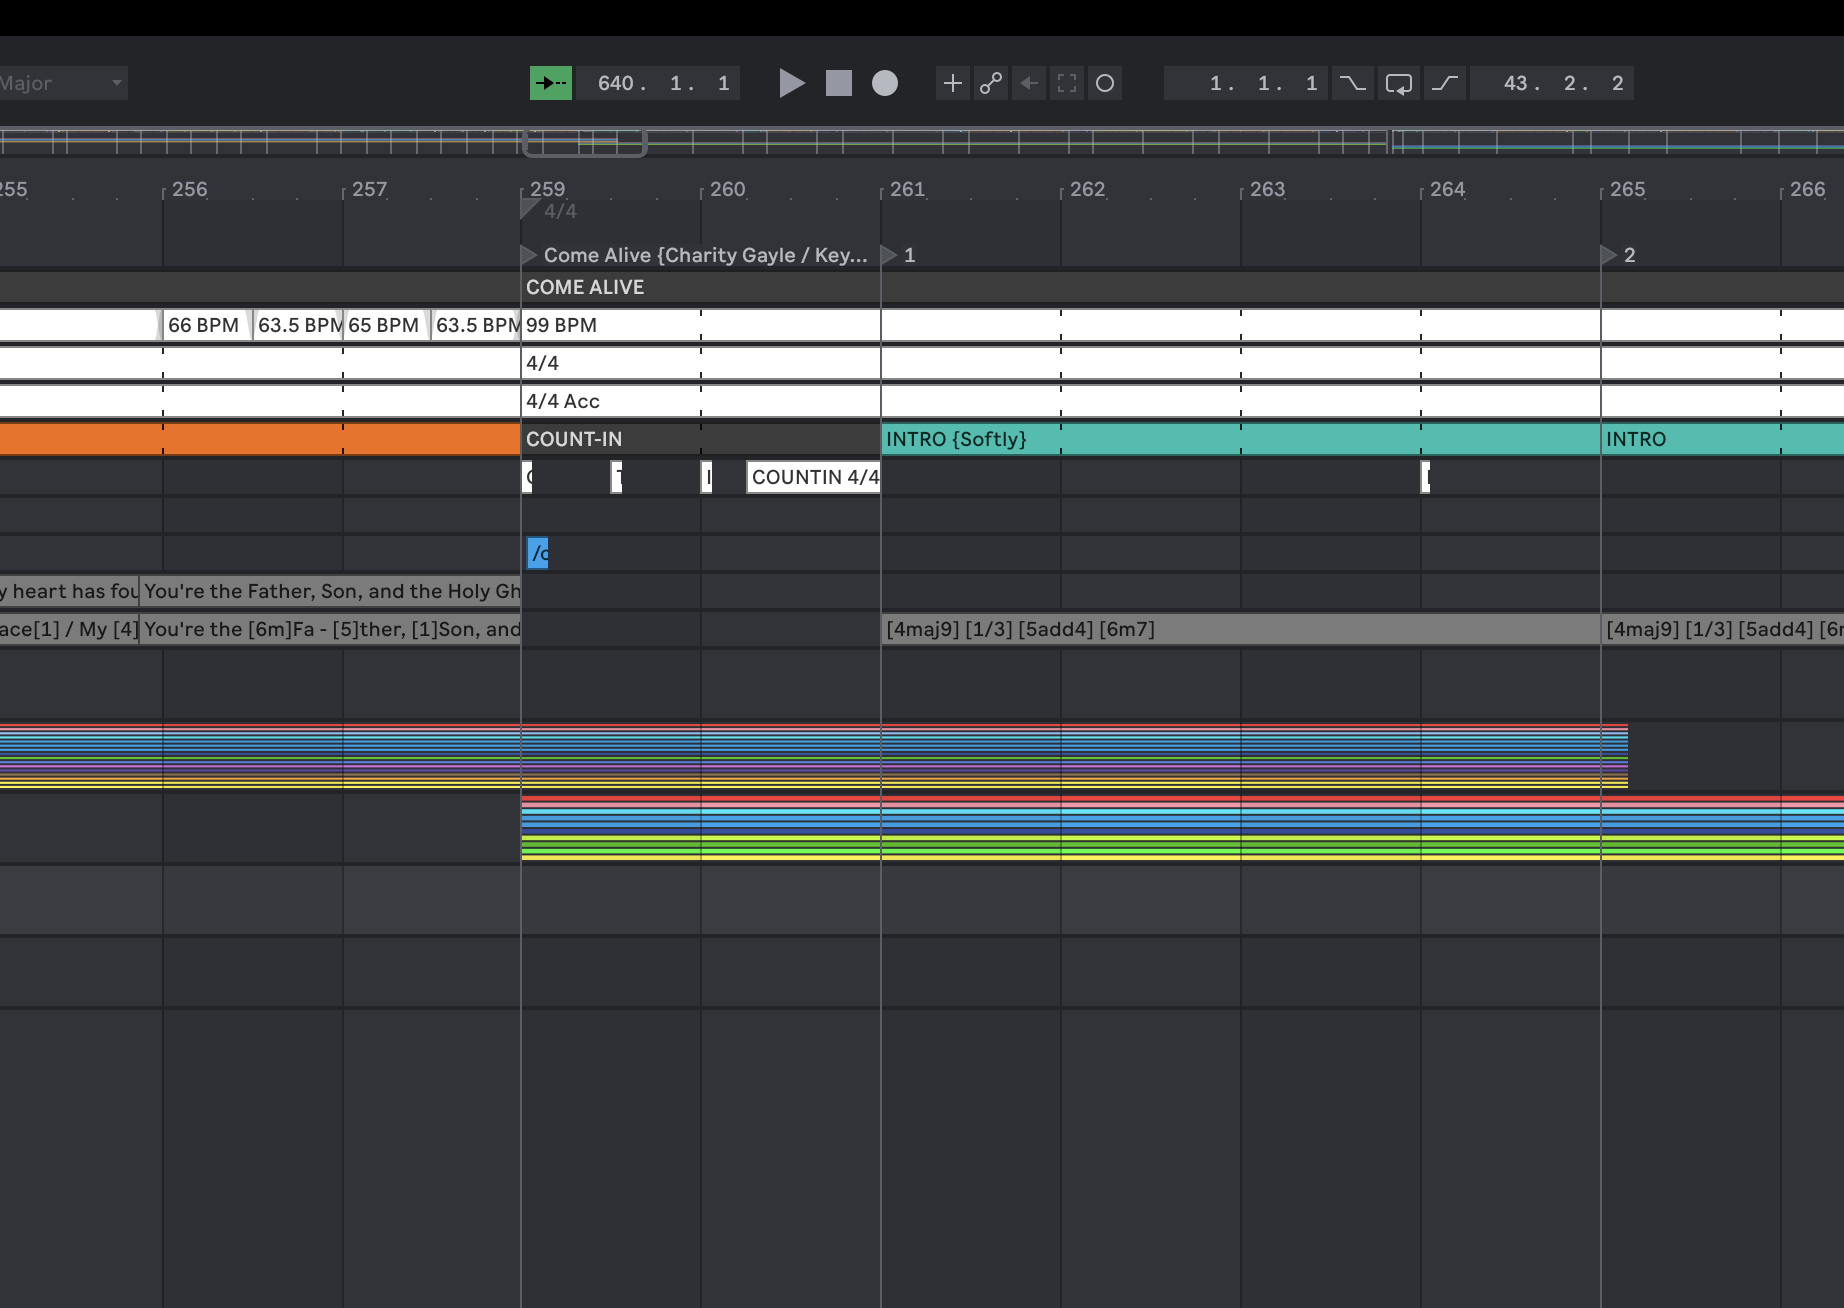 An overlap in the built set: the outgoing song's final bars sit under the incoming song, each at its own tempo.
What hands off, and when. Through an overlap the grid, meaning
tempo, meter, click, guide, and section markers, hands over to the incoming song at its downbeat. Content
cues such as lyrics, numbers, OSC, and lighting carry on from the outgoing song until the new one places
its own.
Why measured in the outgoing song's bars: when you picture a set, you feel the current song ending, so the overlap is easiest to reason about as the last two bars of the song you are in now.
Section 05
Transition preview
Next to each transition is a play button that lets you hear the seam without building the whole set.
- Click the play button beside a transition.
- StitchAble prepares the preview, shown by a brief loading spinner.
- It plays a few seconds of the outgoing song's tail meeting the incoming song's start, honoring the transition you chose and each song's transpose, with the count-in aligned to the real build.
- Click again to stop.
The preview is a dry monitor of the songs' stems, with no click, guide, or effects, which is exactly enough to judge timing, key, and how the overlap feels.
 The play button sits beside each transition.
 A spinner shows while the preview is being prepared.
 While it plays, tap again to stop.
Why: building the whole set to test one seam is slow. The preview answers does this transition feel right in a couple of seconds.
Section 06
Transpose
Any song can be transposed up or down by up to 12 semitones. By default the stems shift with Ableton's own clip pitch and warp, which usually sounds cleanest, and MIDI moves by note. Settings ▸ Transpose, and the Transitions page of the Set Up window, can switch to an AUPitch plugin on every stem instead: one device per track you can tweak or bypass live, at the cost of some latency and CPU. Either way only the key moves; timing stays as recorded.
- Use the transpose stepper on the song's row.
- Read the resulting key shown right beside the stepper.
Songs that change key mid-song are handled, with both the start and end keys shown, for example Ab→A.
 The transpose stepper, with the resulting key shown as you change it.
 A song that changes key mid-song shows both keys.
Transposing across an overlap. When a transposed song overlaps
its neighbor, StitchAble switches to the pitch-shifting plugin method automatically, so the two songs
playing at once stay in time with each other.
Why pitch-only: your tempo map and timing stay exactly as recorded. You get the new key without warping the feel of the song.
Section 07
Click
StitchAble gives the whole set one unified click. Each song's own click pattern is preserved and mapped onto the set's shared click drum rack, so the click stays consistent from song to song no matter where each song came from.
The grid supports downbeat, quarter, eighth, and sixteenth, and the sixteenth-note click plays by default. You can mute individual click pads in Settings.
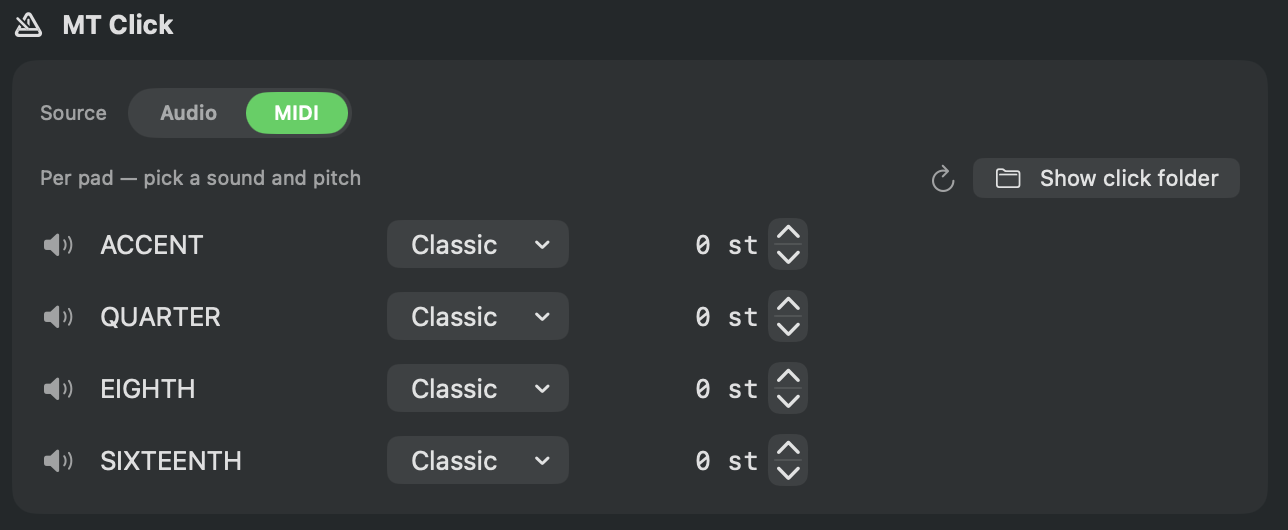 The click grid: downbeat, quarter, eighth, and sixteenth, with the sixteenth on by default.
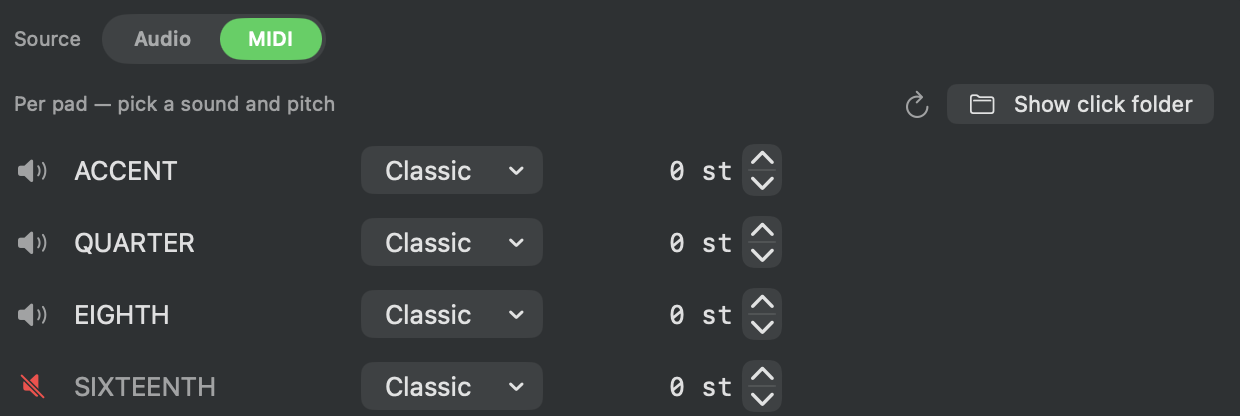 Any click pad can be muted.
Why one shared rack: a set built from many sources can end up with clicks that feel different song to song. Mapping them onto one rack makes the click feel like one instrument all night.
Section 08
Guide
StitchAble also gives the set one unified guide lane for spoken section cues, like Verse and Chorus. The guide instrument is pinned to a single consistent layout, so every song's cues map to the same notes and the guide is easy to maintain in one place.
- Choose a guide voice or family in Settings.
- Use the per-pad cue library to set your section cues.
- Reorder the guide rack as you like.
The guide settings are the same screens as BuildAble's, and both apps read the same files in your User Library's StitchCore folder: the family menu, the Cue Library, and From a Drum Rack… to bring a guide rack in as a family. Change a family in one app and the other sees it. The set carries whatever guide lanes its songs have, spoken-cue or drum rack, and the family fills the racks; there is no guide source to choose.
A guide voice and the click sounds install with the app on first launch, so there is nothing to
download before your first set. Switch voice or family in Settings, or bring in more with
Import Family…, including the MultiTracks samples or your own recordings. Importing only
ever adds: nothing you already have is replaced.
A missing cue stays quiet. If a cue has no recording in the voice you
picked, StitchAble leaves it silent rather than speaking a different section, so the guide never announces
something misleading.
 Choose a guide voice or family in Settings.
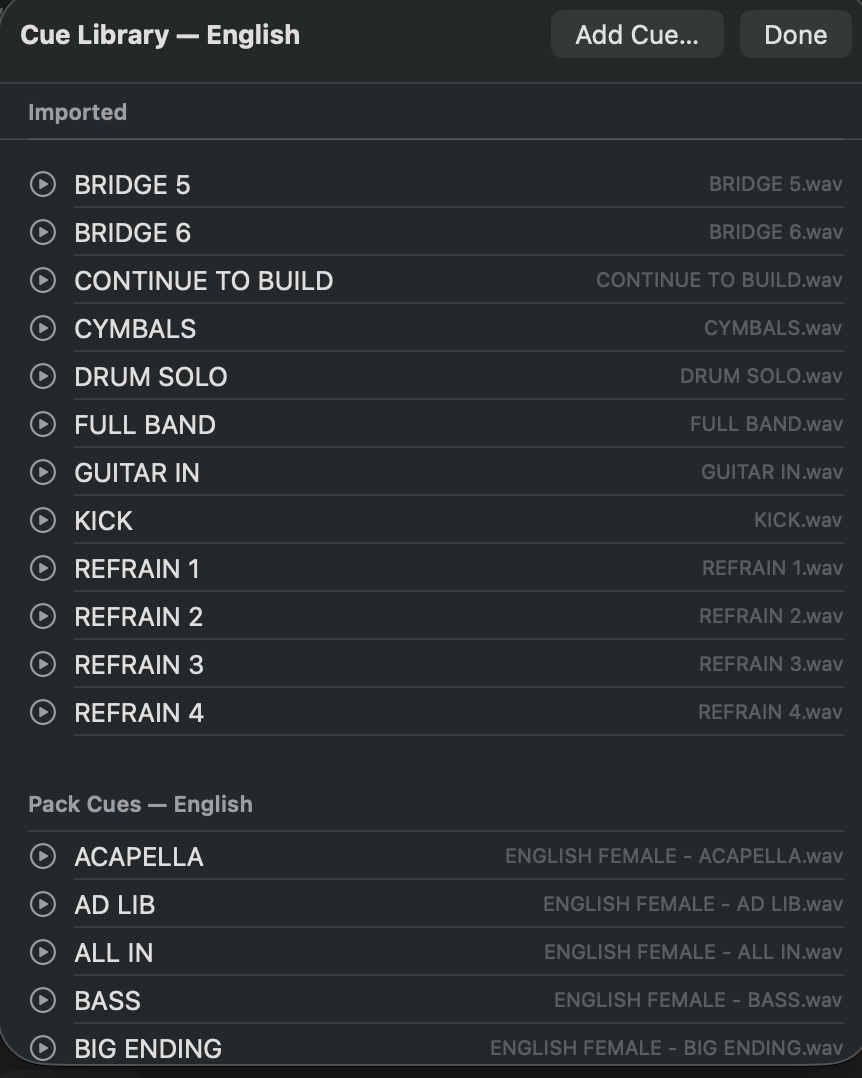 The per-pad cue library of section cues.
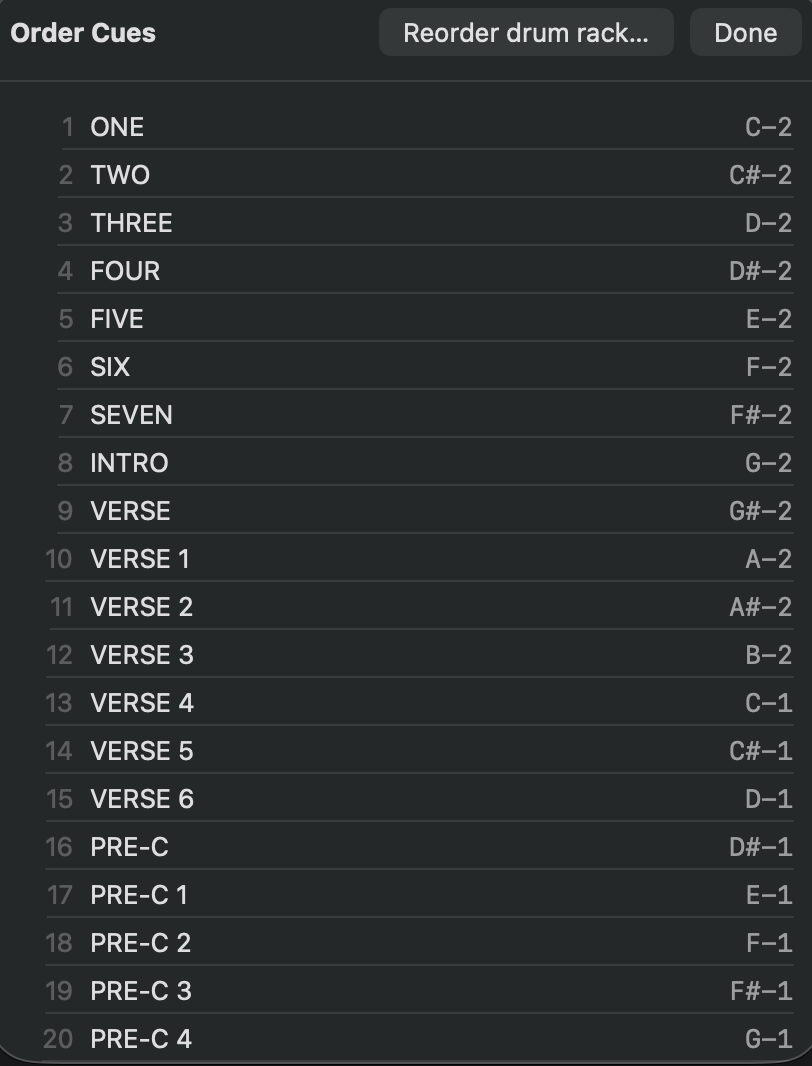 The guide rack, which you can reorder.
Why one layout: when every song's cues live on the same notes, you maintain the guide once instead of relearning it per song.
Section 09
The Set Up window
Press Review and the Set Up window opens: Returns, Track Lanes and Transitions, plus a Template page when the set is built on your own template, with one footer under all of them, Cancel and Build. Every decision the build depends on lives here, and the button that uses them sits right under it. In Live mode the button reads Build & Open in Ableton.
Returns has a section of its own, next. Transitions is the running order again with every join, the seam preview and the crossfade box, inside the build window so you don't have to close it to change a seam. This section is what a set is built on, the Template page, and the Track Lanes page: which lanes merge across the set, how the songs' tracks are grouped, and what the switches beside the tracks do.
What a set is built on
At the top of Track Lanes, and first in Settings under Layout, is Build sets on. It's the same setting in both places.
- Set template, the default. The set starts from a clean template with SONG TITLE, TEMPO, TIME SIG, SECTIONS, OSC and the lyric lanes, one for Live 12 and one for Live 11, and every song is poured into it with a group of its own. It comes out the way sets always have, just no longer shaped by whichever song happens to be first.
- Song 1. The set takes the shape of your first song, its lanes, order and returns, the way StitchAble built sets before 1.2.0.
- My template. Choose a Live Set with your tracks, groups and returns laid out the way every set should look. It has to be saved by the same Live the set is for; the app says so before it builds if it isn't. A template without groups works like the Set template, with your lanes. You can choose it from the TEMPLATE chip at the top of the window too, which takes a Live Set, so a folder with more than one in it is no problem, or a project folder with an AbleSet folder in it.
Your own template
When your template has groups of its own, it decides the set. Every song's groups and tracks land on the template's by name: the song's PISTAS group is your PISTAS, its Drums track is your Drums, and each song's clips play through your track, its devices, sends and color. Lanes at the top level, like SONG and TEMPO, merge by name as always. Your template's order, colors, routing and returns stay exactly as you made them, so the Returns page says so and changes nothing. A track or group your template doesn't have is added where it belongs, at the end of its group, and the next song that has it lands on it too. Your template's own clips and locators are placeholders and are left out; the songs bring theirs.
That's with Merge same audio tracks on, the switch under the running order, which is how your own template starts. Turn it off and your template still sets the groups, their order, colors, routing and returns, but every song gets its own tracks inside them: the first song plays through your Drums, and the next song's Drums is a new track right under it. On, songs share your tracks, so an overlap puts two songs on one track, and Live can only play one clip at a time on a track. So there an overlap always crossfades, and the crossfade box shows checked and locked.
Keep the songs' locator names, on by default with your own template, leaves numbered locators numbered. Off, each section locator is named from the sections lane the way AbleSet shows it, "> VERSE 1". It sits under My template, and on the Template page.
The Template page
With your own template, the Set Up window opens on Template: your template top to bottom, the way the set will come out, with a row marked added for anything the songs bring that it doesn't have. Under each row are chips for the song groups and tracks that land on it, with the numbers of the songs they come from.
- Drag a row or a chip onto another track to play it there. Audio only goes onto audio, and MIDI onto MIDI.
- Drag it onto a group to put it in that group. A song's whole group dragged onto one of yours pours its tracks in there, which is how a song built somewhere else joins your layout.
- Drag it onto Leave out to keep it out of the set.
- Click a chip to split it by song, and move just one song's. The arrow on a chip takes a choice back; Reset All takes them all back.
Two parts of the same song can never share a track: they play at the same time, and Live plays one clip at a time on a track. So a move that would stack them goes back on its own, for the songs it would stack, and a line at the top of the page says why. The page is drawn by the same code that builds the set, so what it shows is what you get, and your choices are remembered for that template.
Merge into one lane: the control lanes
Some lanes merge into one across your whole set instead of staying one per song: Song Title, Tempo, Time Sig, Click, Sections, the guide lanes, lyrics, and any control lane your songs carry. The top of the page lists every one of them, whatever they happen to be called in your songs, and shows you before you build whether they will actually merge.
- Lanes match by name and by type. An audio lane and a MIDI lane of the same name are
two different lanes and will never merge. That is expected, not a fault, so seeing both listed separately
is correct.
- The number strip beside each lane, 1 2 3 and so on, is one number per song in your
set. A number is green when that lane exists in that song and dim when
it is missing. All green means the lane merges into one across the whole set.
- Possible typo. When one song spells a lane differently from the others, StitchAble
flags it. That single character is the reason a lane would otherwise arrive in your set as two.
- Drag a lane to set the order the lanes sit in, top to bottom, in the built set.
- Merge with… joins two lanes with different names into one without touching your song files: an alias applied at build time. It only offers like lanes, so a drum-rack guide can join another drum-rack guide, never the AbleSet Cues one.
- Each guide lane shows what it hosts, the spoken-cue plugin or a drum rack. A song whose guide disagrees with the set's guide settings gets a marker on its row in the running order; hover it and it says what the song has and what the set will do with it.
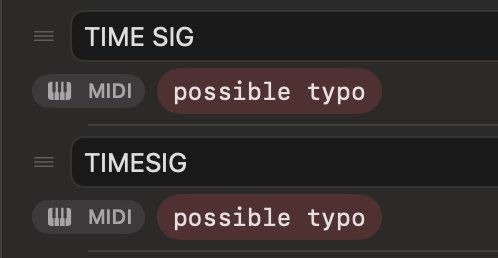 TIME SIG against TIMESIG: one character, flagged as a possible typo.
Fixing a mismatch
- Rename the odd lane inline, right in the review window, so it matches the others.
- Click Apply Renames.
- Build. The lanes now merge into one.
This one writes to your song files. Applying renames edits the songs
themselves, which is the only way the change survives into the build. Each song it touches keeps one
.als.bak beside it, the original, and a later rename never makes a second. Merge with… is the other way: it changes nothing on disk.
The songs' tracks: one group each, or one shared group
This part is for the Set template and Song 1. With your own grouped template, the template decides, as above.
Under the control lanes sits the switch that decides how the songs' own tracks are laid out: Merge same audio tracks, the same switch that sits under the running order. It is off by default, and it changes what the rest of the page shows.
Off: Tracks (by song). Each song keeps its own group in the set, exactly as it came. Expand a song to see the tracks inside it. Beside every track is a switch, Out of group: turn it on and that track is pulled out of its song's group up to a top-level lane routed to Main, so it sits with the control lanes rather than inside the song. That is the one for a cue track only the drummer hears, or a loop that should stay out of the house mix. A track marked consolidated has no switch, because it already spans songs.
On: Tracks, one shared group. Every song's tracks go into one group, one tracks layer for the whole set, which keeps the track count down when your songs share a layout. Tracks with the same name and the same type merge onto one lane automatically, so one Drums lane carries every song's drums in turn, and the green numbers show which songs each lane is in. Use Merge with… to fold differently named tracks together as well, Drums (Live) into Drums, say; it only offers tracks of the same type that don't share a song, so nothing collides, and Unmerge splits one back. The lanes sit in categories, Drums, Keys, Guitars and so on: drag a track between categories, drag a category header to reorder them, or add a category of your own, and the built set follows that order. The yellow NS badge on a track keeps its pitch when a song is transposed, the [noshift] tag. Merging works on tracks, by name and type: name the tracks inside two songs the same and they become one.
Two things ride on this switch. A crossfade across an overlap needs both songs' stems on one lane, so the crossfade box on a transition only appears when the songs are merged into one group; the switch is repeated on the Transitions page for that reason. And the AUPitch transpose method is unavailable in one-group mode, because a plugin sits on the lane and would pitch every song sharing it; those sets transpose with clip pitch and warp instead.
The warning on the main window
Review flashes red when there is a naming mismatch it can fix. If it is not flashing, your lanes already line up and there is nothing to do here.
Section 10
Returns and outputs
Merging songs is the easy half. The half that ruins a Sunday is routing: two songs both have a return called TRACKS and mean different outputs, a Live 11 song sends one to Master and means nothing at all. Get it wrong and Live resets your routing, or won't open the file. So the Returns page shows you the plan before it builds.
Every song's returns sit on the left, the set's returns on the right, and a colored wire runs from each song return to the return it will land on. Each return on the right has a name you can edit and an output of its own, chosen from the hardware outputs your interface has. Add Return makes a new one, a return nothing feeds dims and slides aside, and the A/B/C letters Ableton shows come from position, so they are not part of the name. A song return that carries an effect device keeps the first one.
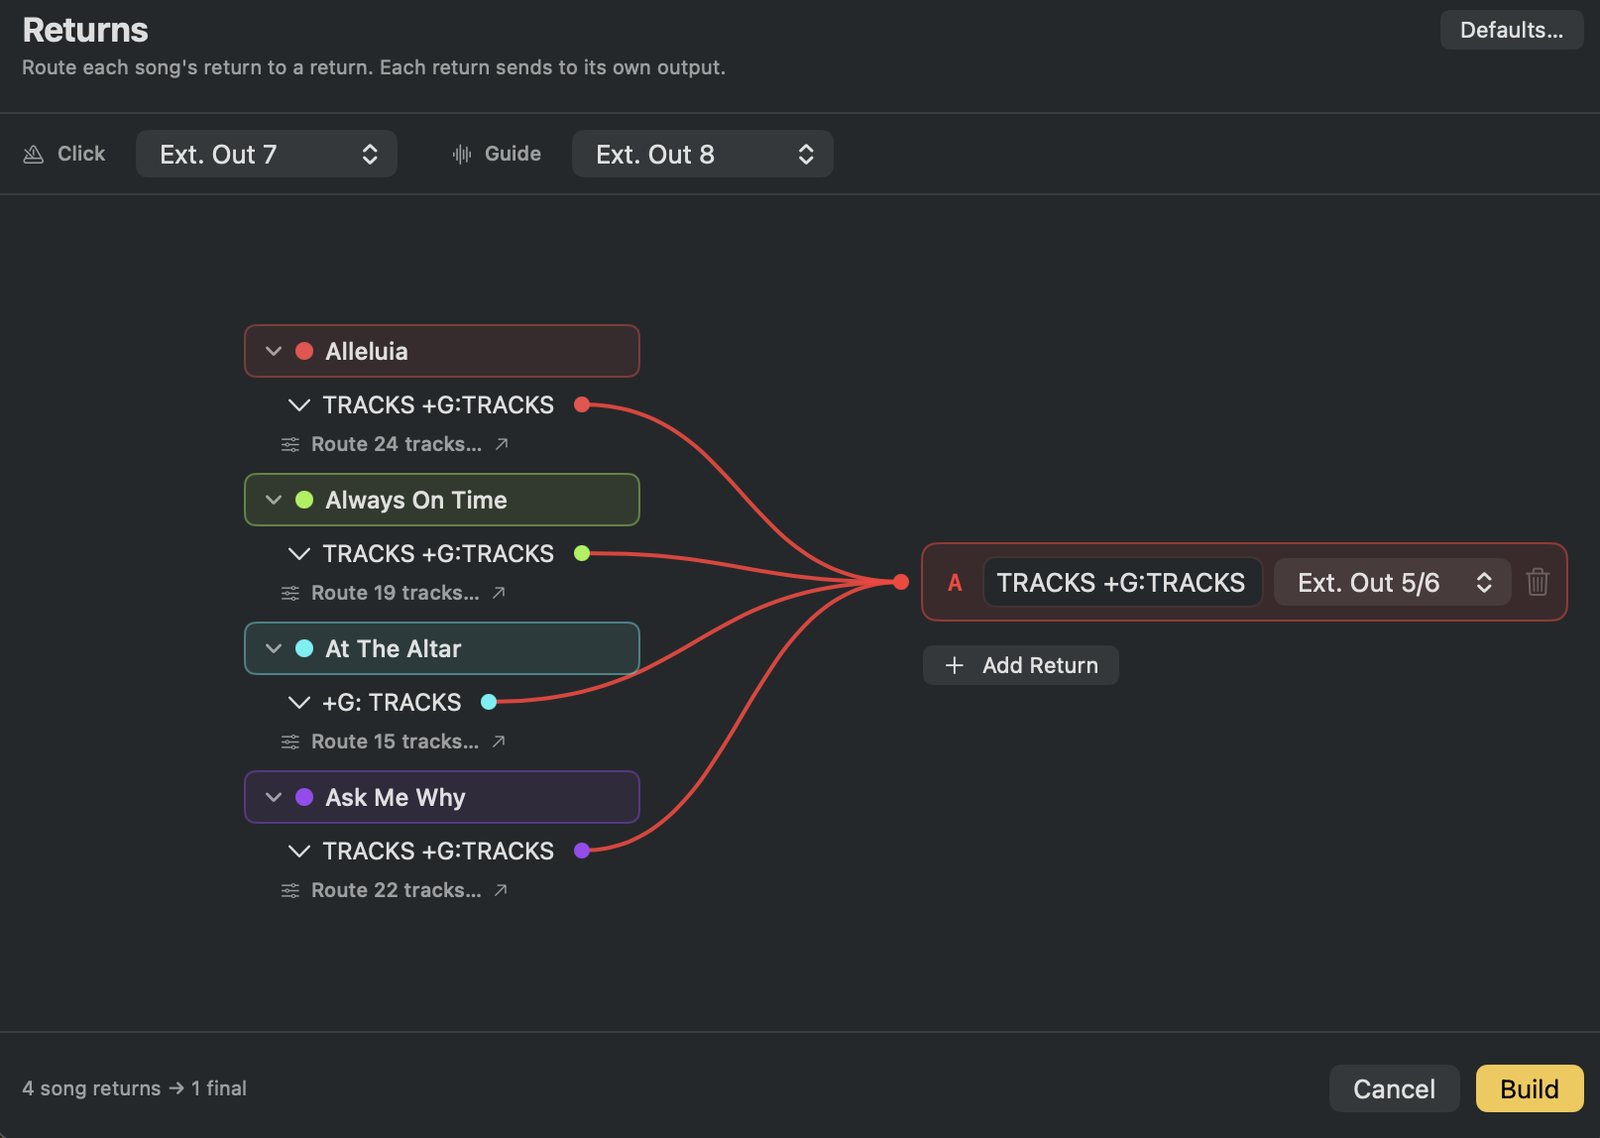 The Returns page: every song's returns wired to the set's returns, each on its own output.
With your own grouped template, its returns and routing are used exactly as they are, and each song's sends are matched onto your returns by name. This page says so and changes nothing.
Down to the stem
Click a song and the board zooms into it: every stem in that song, each with its own wire. Drag to reorder them, and send any one somewhere of its own: to a different return, to a New return… made on the spot, or straight to an output with Send to output…. A loop that shouldn't hit the house, a cue track only the drummer hears. The No shift badge on a stem keeps its pitch when the song is transposed. All returns takes you back to the overview.
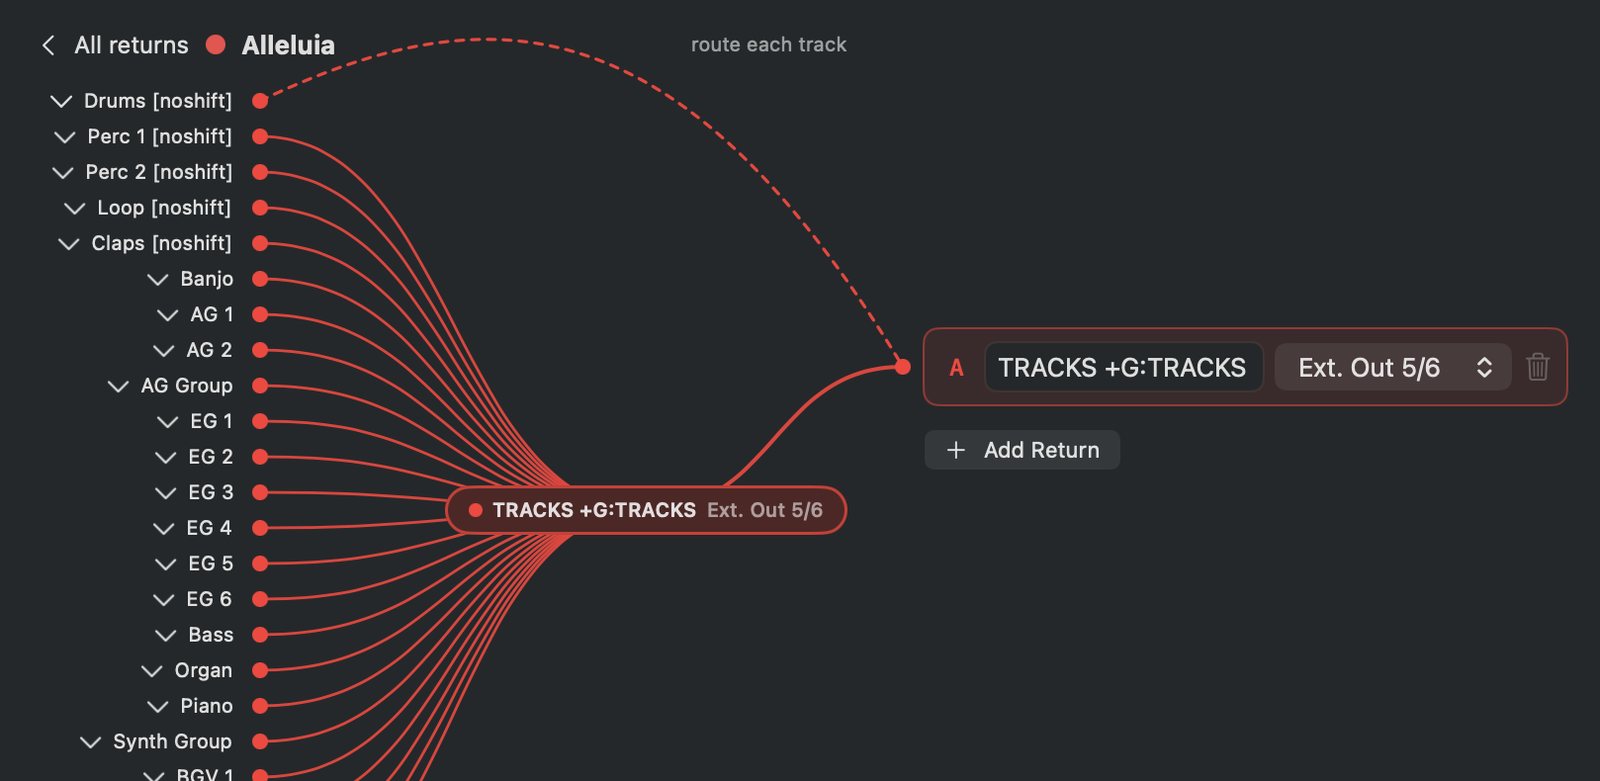 One song's board: every stem, individually routable.
With the songs merged into one group (Section 09) the board shows the shared tracks instead of songs, and you route each track once for the whole set.
Click and guide
The set's one click and one guide have outputs of their own, the two pickers along the top of the page. A song's own click and guide tracks, the ones BuildAble 1.3.3 can keep in a session, merge like any click and guide: never transposed, and on those same two outputs. Settings ▸ Output routing sets how many hardware outputs your interface has, 8 to 128, which is what every output menu offers.
Track Rules
Press Track Rules… for what StitchAble remembers between sets. The screen it opens is titled Track Rules (it was Defaults before 1.4.3). It all follows the track name: every track StitchAble has seen, the category each one sits in and the order of the categories, each track's color, and the names you have told it never to merge with their look-alikes. Drag a track by its handle onto another category to move it, and right-click one to take it off the list. Set it up once and the next set that uses the same songs comes back exactly as you left it.
Return rules for each place you play
Play at more than one church? On the Track Rules screen, the place menu at the top adds a place, and each place keeps its own returns, each with an output, and the return every track goes to, picked right beside the track. A whole category can go to one return too: pick it in the category's header, and a track's own pick still wins. Anything you don't pick goes to Everything else, which can be one of the returns, Song group (the song's group plays those tracks out to Main) or Nothing (no return, so they're silent). Then on the Returns page, Apply Return Rules puts that place's returns on the set in one click, and its arrow picks another place. Colors, categories and order are one setting for every place; the returns belong to the place.
Why reconcile returns: two songs can define the same return differently. StitchAble sorts that out before the merge, in front of you, so nothing collides and every song still sounds the way it did on its own.
Section 11
Live 11 or Live 12
Choose your target Live version, and the set opens natively in Live 11 or Live 12, with the format differences handled automatically.
MultiTracks and older songs are converted for you; Live 12 songs are used directly.
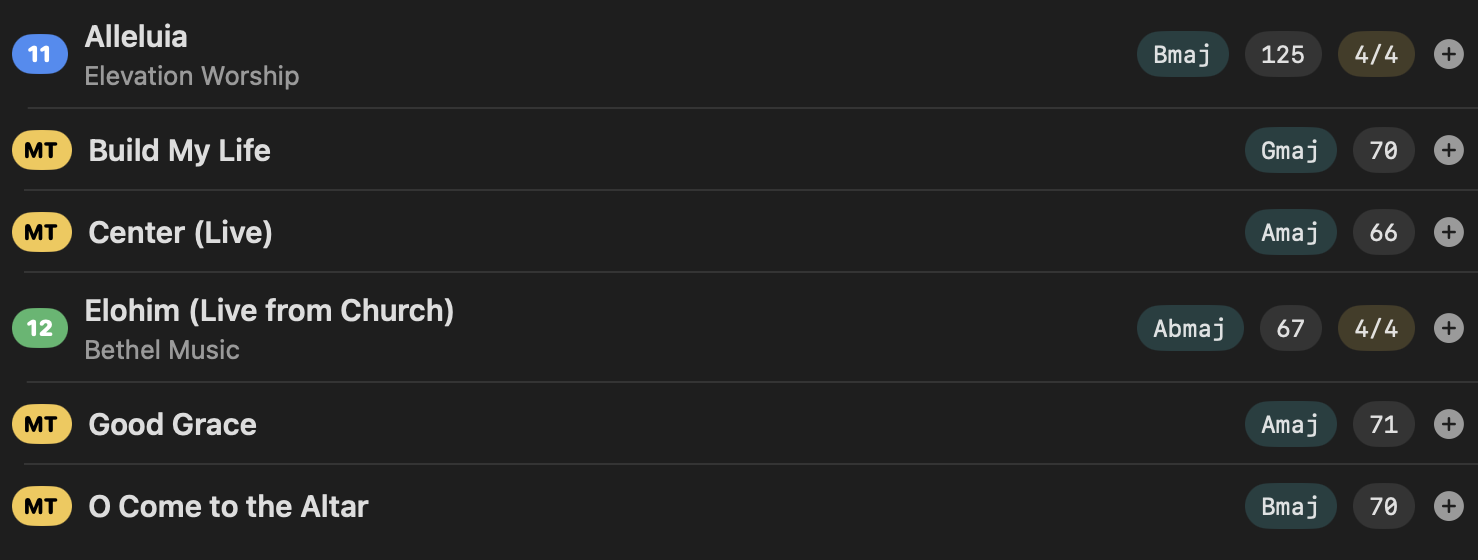
The mode shows on the library too. Each song carries a badge, gold 12 for a song saved by Live 12 and white MT for a MultiTracks download, and in Live 11 mode the Live 12 songs grey out, because Live 11 cannot open them and a set built from one would not open either. In Live mode the connected Ableton decides the mode for you.
A Live 11 set is built in Live 11's own form: the tempo and meter map, the note editor's lanes, the clip scales. It opens with no conversion prompt.
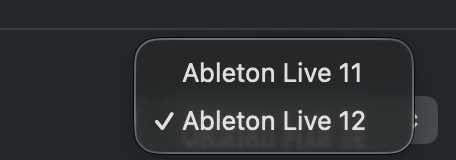 Pick Live 11 or Live 12 as your output target.
Why it matters: build for the version you actually run on stage, and the set opens clean with no conversion prompts in front of your congregation.
Section 12
StitchAble Live
With your set open in Ableton, press Live in StitchAble's footer and the app edits the open set instead of a file. Keys, names, levels, sends, returns and AbleSet skips and loops change in Live the moment you make them, and a rebuild is one button when you need one.
Setting it up, once
- Press Live. If the StitchAble bridge is not in your Ableton User Library yet, the panel offers Install the bridge. Click it.
- Restart Ableton, open Settings, and under Link, Tempo & MIDI pick StitchAbleBridge as a Control Surface. Live 11 and Live 12 each keep their own list, so do it in each one you use.
- Open a set StitchAble built. The Live button glows when Ableton answers, fire for Live 12 and blue for Live 11.
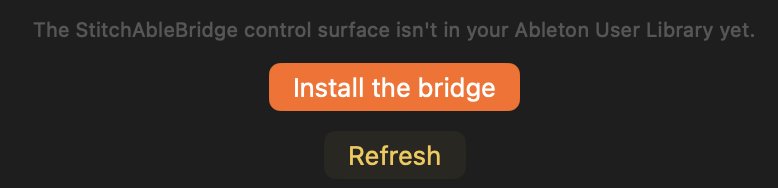 The Live panel before the bridge is installed.
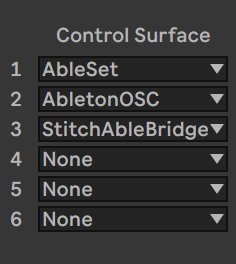 Ableton's Control Surface list with StitchAbleBridge picked.
The bridge is a small control surface script. It reads and edits the open set through Ableton's own API and nothing else; it never touches your files. When a new StitchAble ships a newer bridge than the one in your User Library, Live mode says so: press Update the bridge and restart Ableton.
Build & Reapply answers Live's save prompt. When the rebuilt set opens, Live asks whether to save the one it has. The set on disk is the one just built, so StitchAble presses Don't Save for you; the switch is at the top of the Live panel, on by default. Anything you changed by hand in Live since its last save goes with it, which is why the switch is there. It needs the bridge from StitchAble 1.2.0 or later.
What you can change live
- Key. Step a song's transpose and its stems retune in place. Warp shifts the clips (a stem is warped first, so its length holds exactly); AUPitch puts a pitch plugin on each stem instead. Switch per song.
- Stems. Expand a song for its tracks: rename them and press Apply, mute, set the level in dB, and set each send.
- Returns. Rename, add and remove the set's returns.
- Song names. A row's Edit… renames the song: its title, its SONG TITLE clips and its group change in place, and a refresh or a rebuild keeps the new name. A key change keeps the title's tempo and time. Live 11 can't rename a locator, so there a rename waits for Build & Reapply.
- Click loops. A loop's name and key change live too. On Live 11 they wait for Build & Reapply.
- Sections. The song's section editor sits above its stems, showing the sections the open set actually has. Loops, deletes and reorders go to AbleSet as flags, see below.
The running order and the open set
Pressing Live takes the open set as the running order, read straight off the set: its songs in its order and at its keys, each song's sections as they sit on the timeline (skips, loops, repeats and trims included), the click loops between songs, and how each song joins the one before. What Ableton has is what you see, so the app never asks for a rebuild over something that hasn't changed. Songs the set has that your library does not are listed too; you can mute, transpose and rename them live, but a rebuild cannot include them. Add or remove a song in the running order and Review starts pulsing: Build & Reapply rebuilds the set from the running order with every key, name and arrangement you set still in place, and opens it in the Live you are connected to.
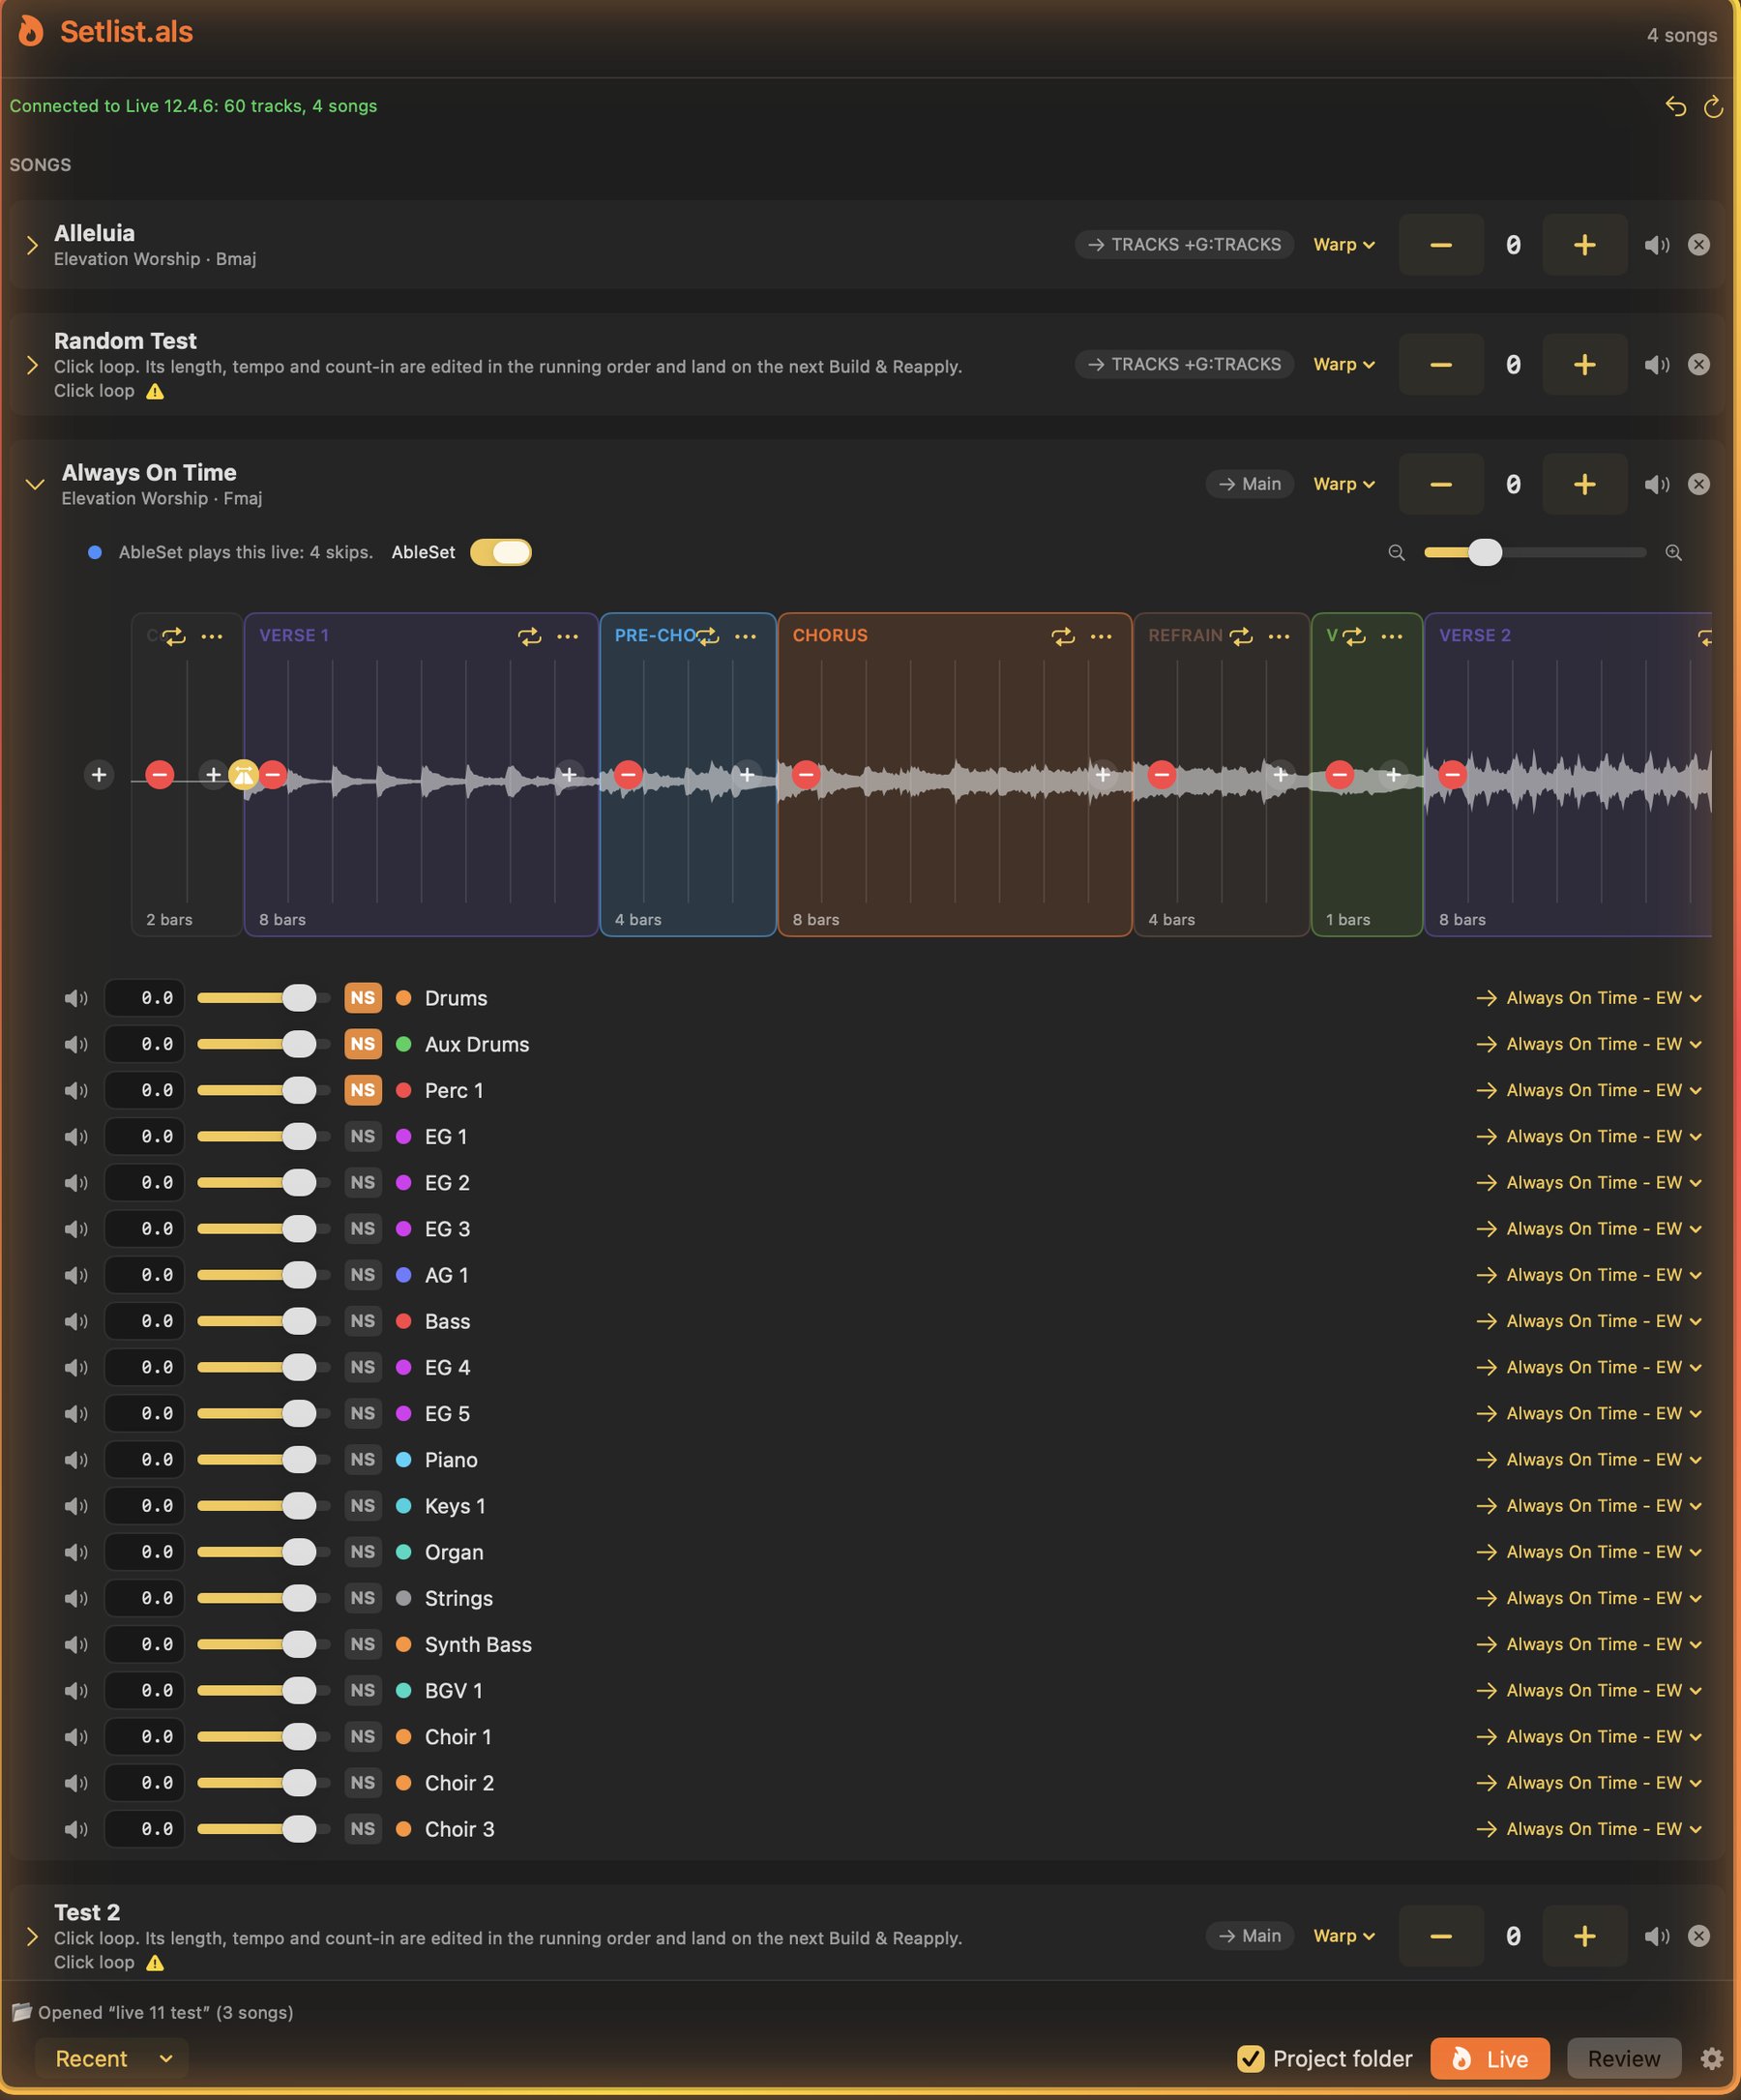 Live mode on a four-song set, its two click loops included, one song expanded to its sections and stems.
Sections live, through AbleSet
The editor tells you which way an edit reaches the set. A blue dot above the timeline means AbleSet plays it live: a loop becomes +LOOP:N on the section and a dropped section becomes +SKIP, written onto the section in the open set the moment you make the change, and looped cards wear a blue ring. The guide follows: the bar before a skipped section announces what actually comes next, so the band never hears a section that is not coming. Put a skipped section back where it was and the skip comes off, live.
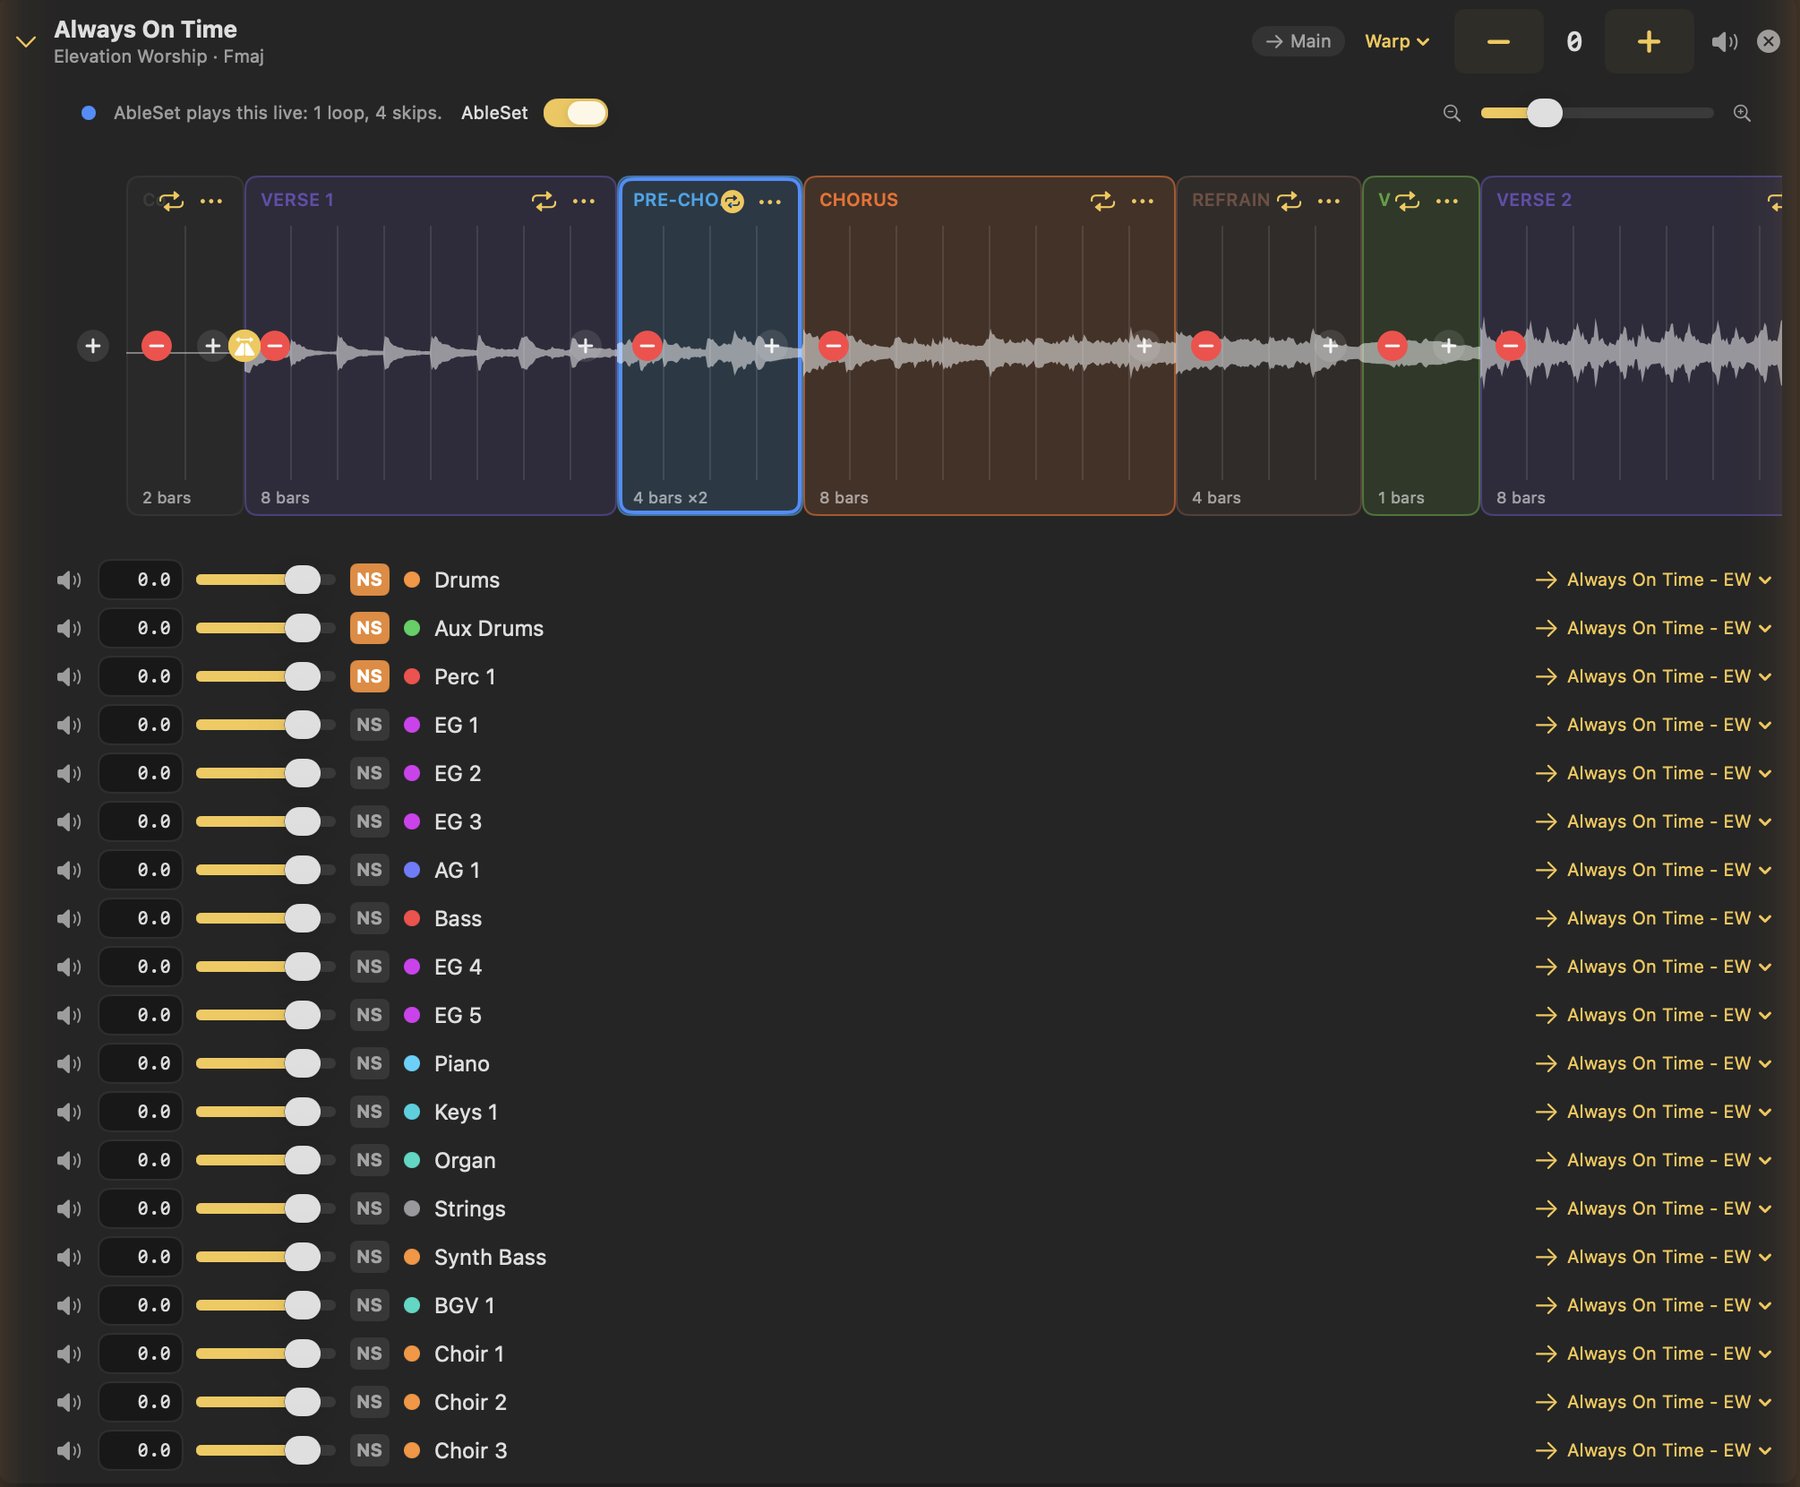 Blue: AbleSet plays this live, one loop and four skips.
An orange dot means it needs Build & Reapply. That's anything that moves, adds or re-cuts audio: a reorder, a repeat, a trim, a rename, a click loop, any fade into or out of a section. Live, AbleSet can skip a section that's there with its fade off and loop one, and that's all, so those are the only section edits that go live. AbleSet, the switch beside the dot, turns that off for a song: drops go to the rebuild and are really cut, and the loop buttons go away. It's the same switch the editor has outside Live mode, saved with the arrangement. Press Live on a set that already carries skips or loops and the editor opens on what AbleSet is playing.
Build & Reapply keeps the routing that's in the open set: each track's output and sends come across to the rebuild, and so do your returns' outputs. It reads the saved set, so save in Live first if you changed something. A stem you route by hand in the review for that build goes where you sent it.
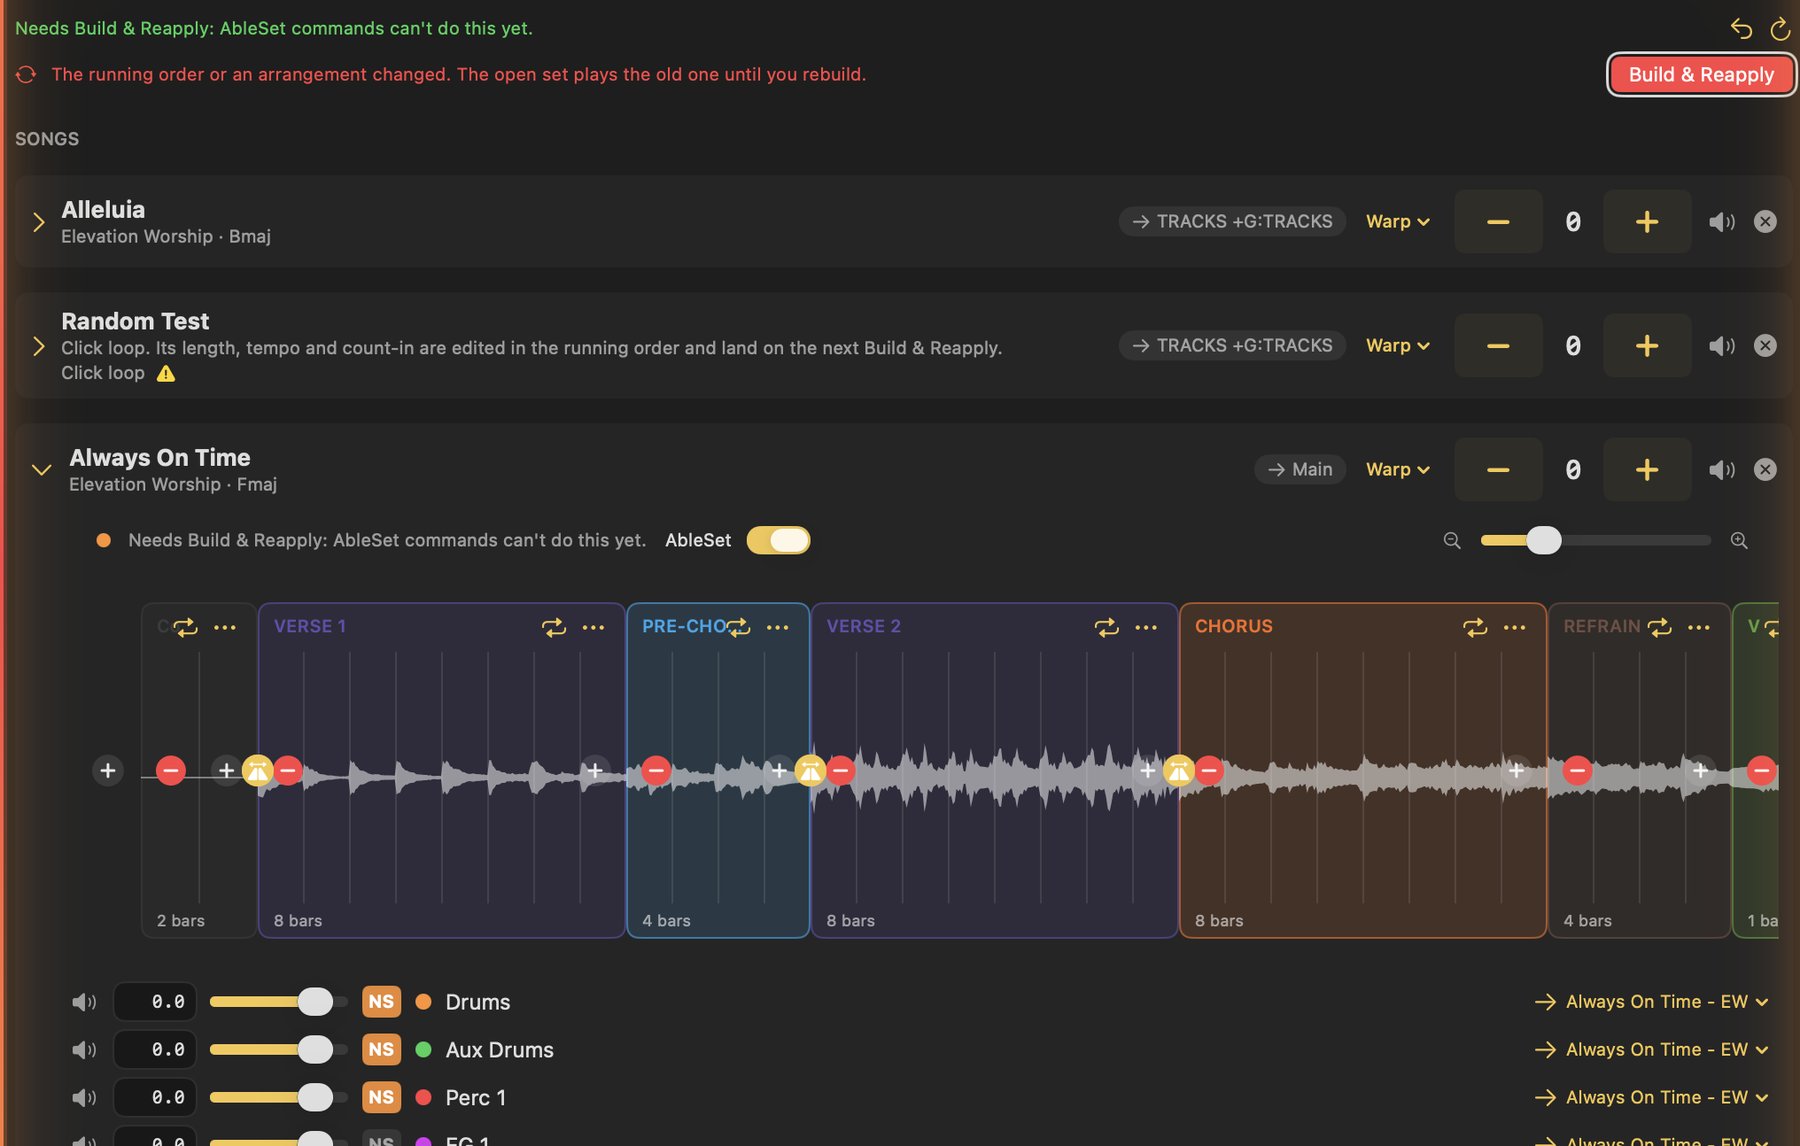 Orange with the switch on: a reorder, which AbleSet's commands can't do.
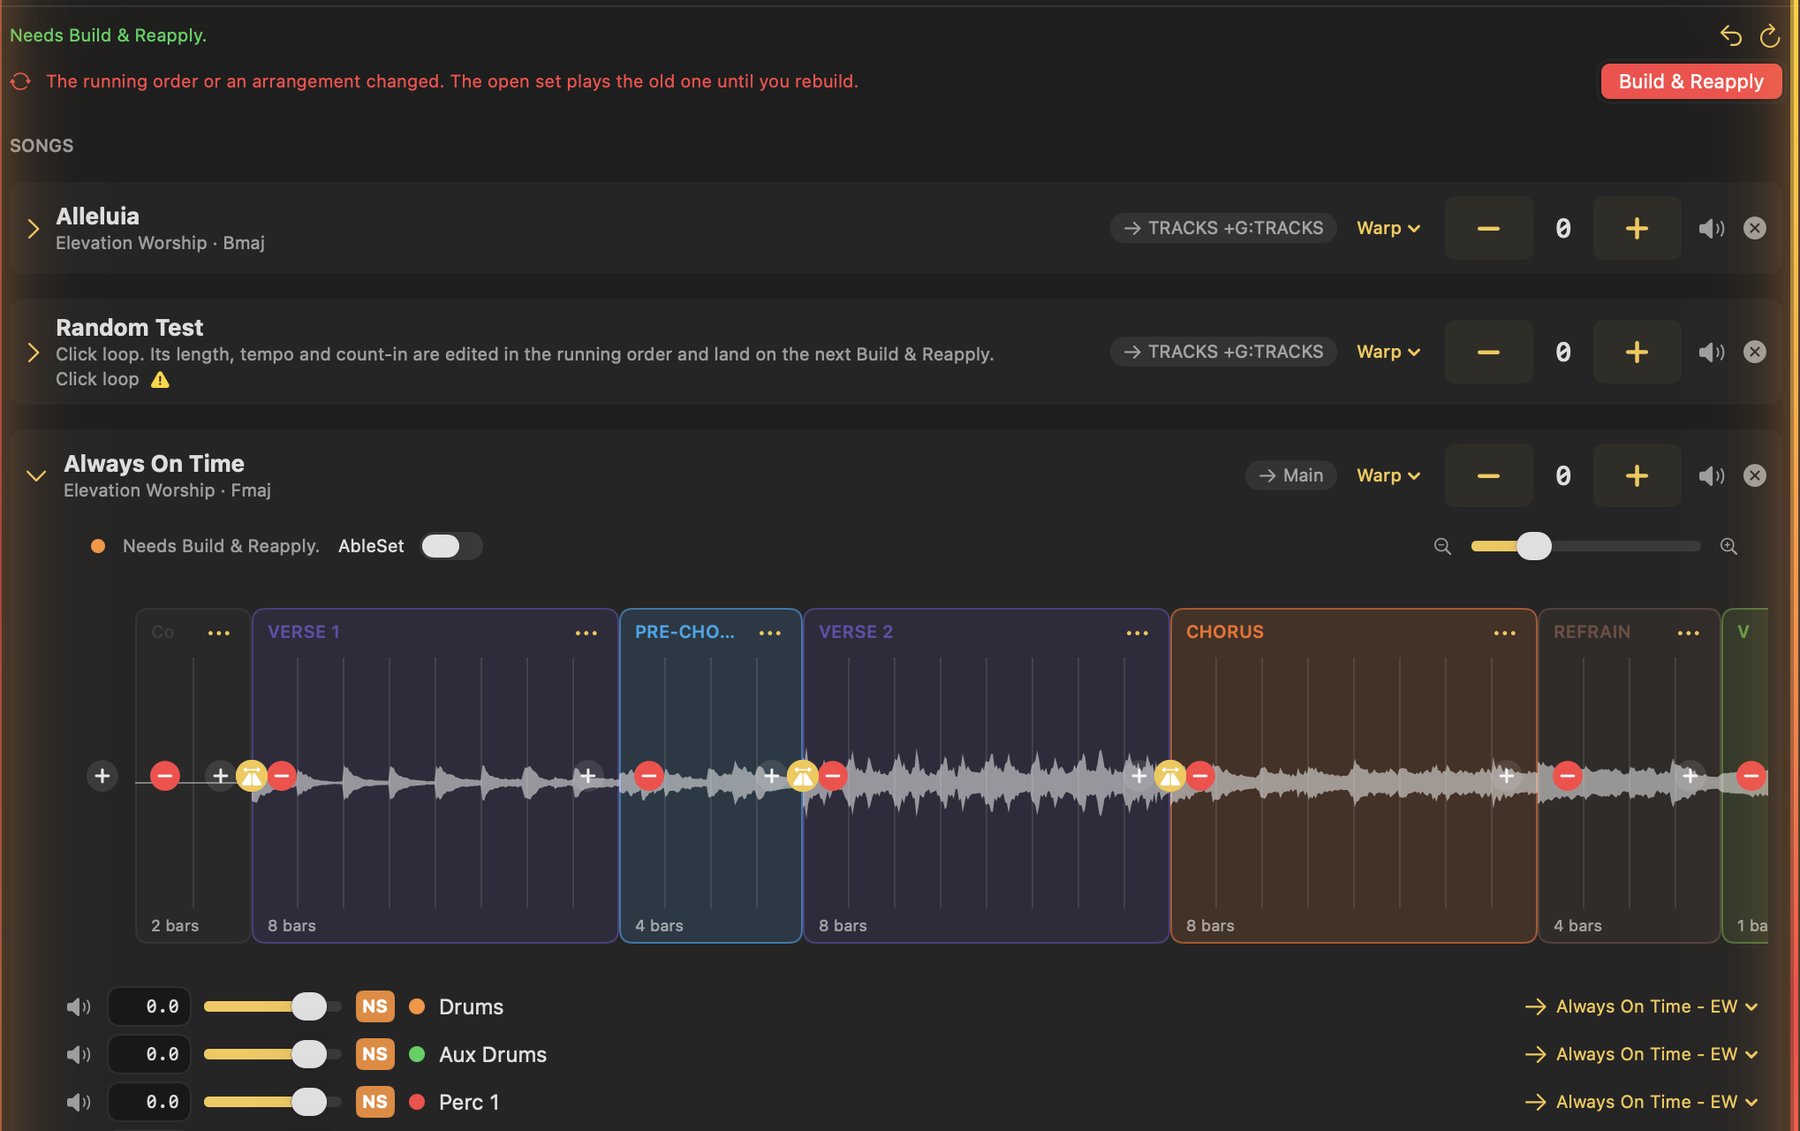 Orange with the switch off: a dropped section waits for Build & Reapply.
 Grey: nothing changed, the set plays as it was built.
Two Lives at once. Live 11 and Live 12 can both be open. Each bridge takes its own port, and StitchAble talks to the one matching its Live 11 / Live 12 mode. The connected Live decides the mode: a Live 12 file will not open in Live 11, so Build & Open refuses a mismatch and says so.
Live 11 note. Live 11's API will not rename a locator, so a flag lands on the section clip only. AbleSet reads it from there, so loops and skips work the same.
Why the set, and not the file: the night before, the set is already open and half rehearsed. Editing it in place means the change is in the set you are looking at, with Ableton's own undo behind it, and the rebuild is there for the changes that need it.
Section 13
Recent sets
StitchAble remembers your recent sets. Reopen a recent running order from the Recent menu instead of rebuilding it by hand.
A recent set remembers its transitions and each song's arrangement, so reopening it puts back the seams and the section order you chose, not just the songs.
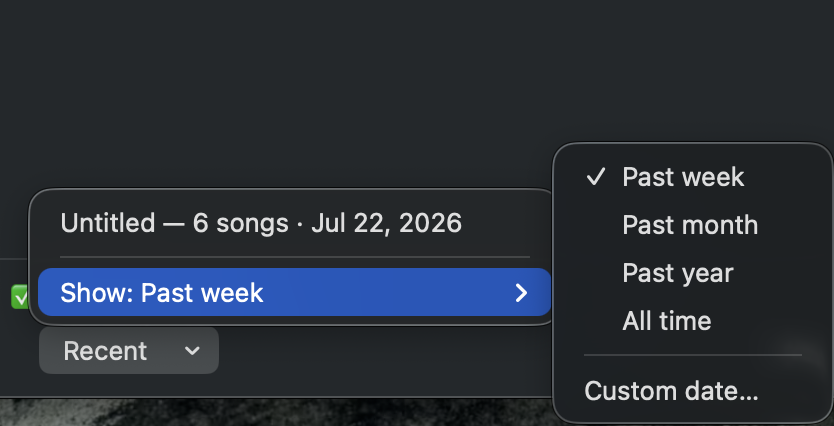 The Recent menu, for jumping back into a set you built before.
Why: many sets repeat week to week. Reopening beats rebuilding.
Taking a set to another computer
Every set built as a project carries its click, the TEMPO lane's blank audio and a set card: its running order and a small copy of each song's session. So StitchAble on another computer can open it, rearrange it and rebuild it. It finds the card by itself when you press Live, and Recent, Open a Set does it without Ableton open. The stems are the one thing that doesn't come along. Those need the same drive plugged in, or a Collect All first.
To bring everything, press Transfer in the Set Up window, next to Build. It builds the set, then packs it into one zip with each song's whole folder, stems and all. Put that zip on the other computer and choose Recent, Import a Transfer. The songs go in your library, the set goes where your sets go, and the running order loads, ready to rearrange or open in Live.
Import has to do this part. Don't just unzip it: the set's stems sit in the song folders, and Import is what connects the two. A song that computer already has stays as it is, even if the two copies are different, and a set with the same name stays too, with the new one landing beside it. If a stem couldn't be found, both Transfer and Import tell you how many.
The zip is about the size of the set's stems, since those don't compress. Your plug-ins don't come along, so that computer needs them installed, and it needs a Live version that can open the set. Its outputs are whatever its audio interface has, so check them if the click or tracks don't come out where you expect.
Section 14
Library markers
Every song in the library carries a few marks that say what it is before you add it. Hover any of them and a box explains it.
- The version badge. Gold 12 for a song saved by Live 12, white MT for a MultiTracks download. In Live 11 mode the Live 12 songs grey out, since Live 11 can't open them.
- The guide marker says what the song's guide is: the AbleSet Cues plugin, a drum rack that the set fills from your family, an audio guide stem, or an audio guide lane with nothing on it, which will not speak for this song.
- Key, BPM and meter pills, read from the folder name or the file. A song with no key shows Set key on its row in the running order, so transpose-to-key and the key display work for it like any other.
- A warning triangle means more than one project file shares the folder. Each is listed separately, and one may be a stray or a backup you didn't mean to keep.
- Medley titles show their slash, though the folder on disk carries an underscore, since a slash can't live in a path.
Folder names are the source of truth. Title, artist, key, BPM and meter are read from the song's folder, so a typo there reaches the set. Fix it in BuildAble's Song Library, where Rename… shows every file and sample reference that would move before it moves anything, or in Finder, and choose the folder again.
Section 15
Settings
Settings is where you set up the pieces the whole set shares: the guide family and the Cue Library, the click sounds, what travels into the set's AbleSet folder, the transpose method, the layout of the set, and how many outputs your interface has. The Cues, Click and AbleSet sections are the same screens BuildAble shows, on the same files.
- Layout, first. Build sets on the Set template, Song 1 or your own template, and with your own, Keep the songs' locator names. Gap between songs is the gap every song joins the set with. Keep source track colors preserves each song's own track colors in the merged set instead of recoloring stems by instrument.
- Cues. The guide Family, the Cue Library… to browse and play every cue you own, Order Cues… for the display order, and Import Family… to bring more in: From a Folder or Zip… for a family of recordings, the free MultiTracks Click and Guide Samples pack included (its clicks come along too), or From a Drum Rack… for a guide rack of your own. It only ever adds. Build Test Set writes a session that plays every pad in order, ten seconds to hear your whole voice. The one family is for both kinds of guide: it fills a drum rack guide's pads, and the whole family, stock and your own recordings, travels with every set in its AbleSet/Cues/Custom folder, where AbleSet Cues speaks from. Every guide lane comes over from Song 1 or the template as it is. Built on your own template with no drum rack guide, the family is greyed out, since there's no rack for it to fill.
- Click. A sound and a pitch per pad, mutes, Show click folder for clicks of your own, and a re-scan. A pad you haven't touched says Classic, and Classic (default) at the top of its sound menu puts it back.
- AbleSet. The template folder, and what travels into each set's AbleSet folder: the spoken cues, canvases, custom styles and scripting, each from the main source or from a folder of its own. Settings, under Scripting, is off until you tick it; Choose… then picks which of AbleSet's own settings files come along, your OSC connections and their On Create commands, your project settings and password, your device views, with the ones that only work on one Mac marked this Mac only. AbleSet's file cache, its setlists, your backup files and your script's saved shared variables never come, so a new set starts clean.
- Song titles. What each song's title locator says after its name, which AbleSet shows with the song: Artist, Key, BPM and Time signature. StitchAble's choice decides the set, however its songs were built. With everything off the title keeps an empty
{}, so it's still read as a title. Song name lane matches the title, on by default, keeps each song's SONG TITLE lane the same as its title, #tags included or left out.
- Live bridge. The bridge you have installed and the one this StitchAble carries, with Install or Update the bridge and Show in Finder. It works with Ableton closed. After an update, restart Ableton.
- Transpose. Use an AUPitch plugin on every stem instead of clip pitch and warp. Unavailable when the songs are merged into one group, since a plugin on a shared lane would pitch every song on it, and on your own template, where songs land on the template's tracks.
- Previews, in the Click & Guide sheet. Leave out of previews is the list of words that keep a track out of the transition preview and the waveforms. It starts with click, guide, and Reset to default puts it back. It never changes what gets built.
- Add-ons. The outside tools the app can hand work to. AbleSet is on by default: skips, loops and click loops ride on its flags. Off, no flags are written anywhere: the switch, the loop buttons and the blue markers go away, and a dropped section is really cut. Each arrangement also has its own AbleSet switch above its timeline. Ableton's Extensions is listed but not available yet, since its SDK can't move time.
- Output routing. How many hardware output channels your interface has, 8 to 128. That is the list every output menu offers, on the Returns page and for the click and guide.
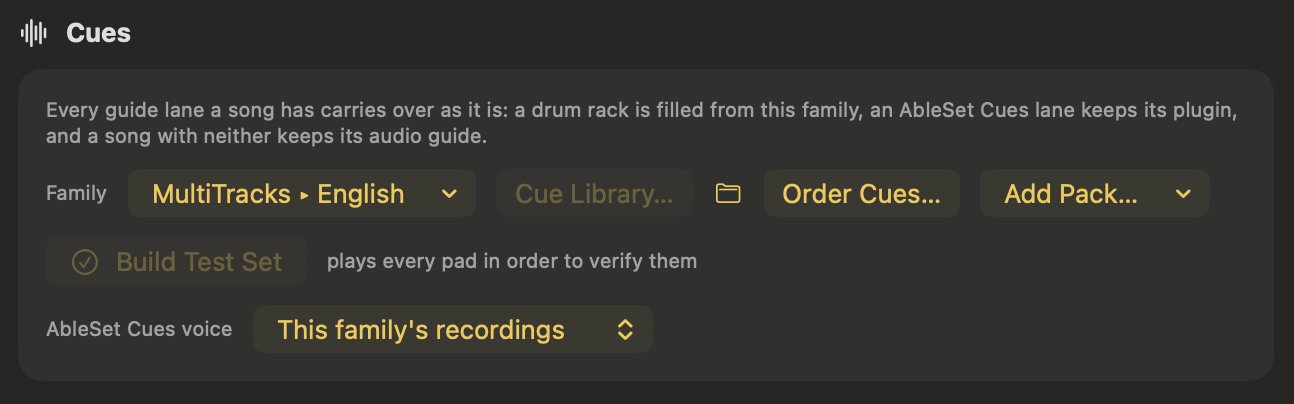 Cues: the guide family, the Cue Library, Order Cues, Import Family and Build Test Set.
The Cue Library lists every cue a song can say, with the recording that says it, where it comes from (Stock or Yours), and the ones with nothing recorded, which AbleSet's generated voice says instead. Listen to any of them, add your own recording, or play a different one, and search or show only what's missing. Your recording always plays instead of a stock one of the same phrase, and stock recordings are never overwritten. The Songs in Another Family tab lines another family's cues up against this one, for a set that plays songs built in both, and every match there can be seen and changed.
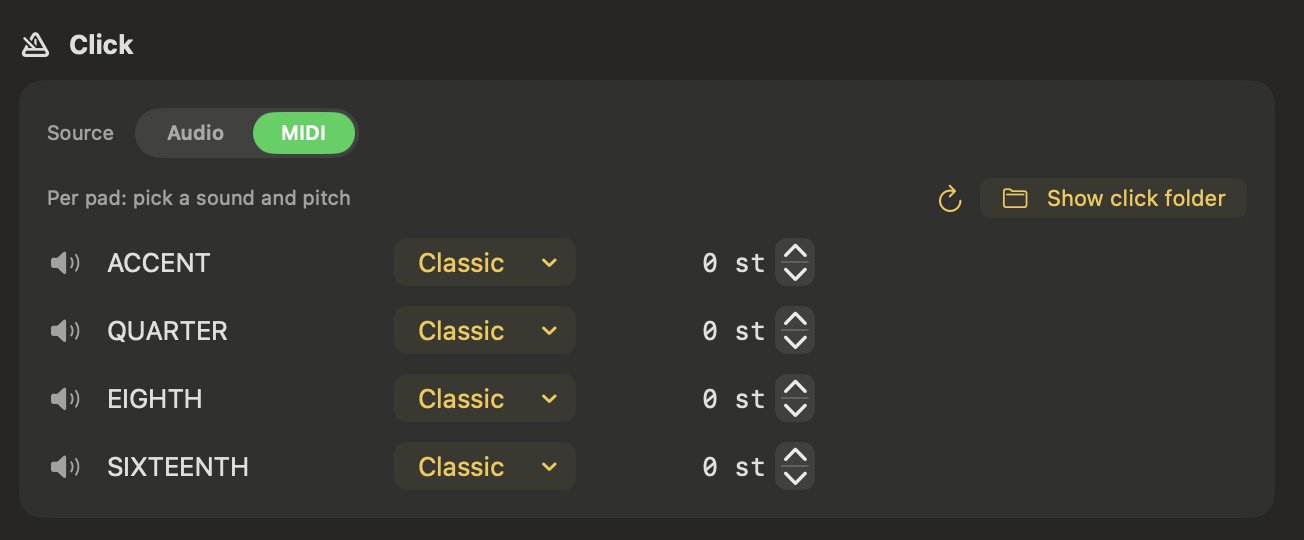 Click: a sound and a pitch per pad, and your own click folder.
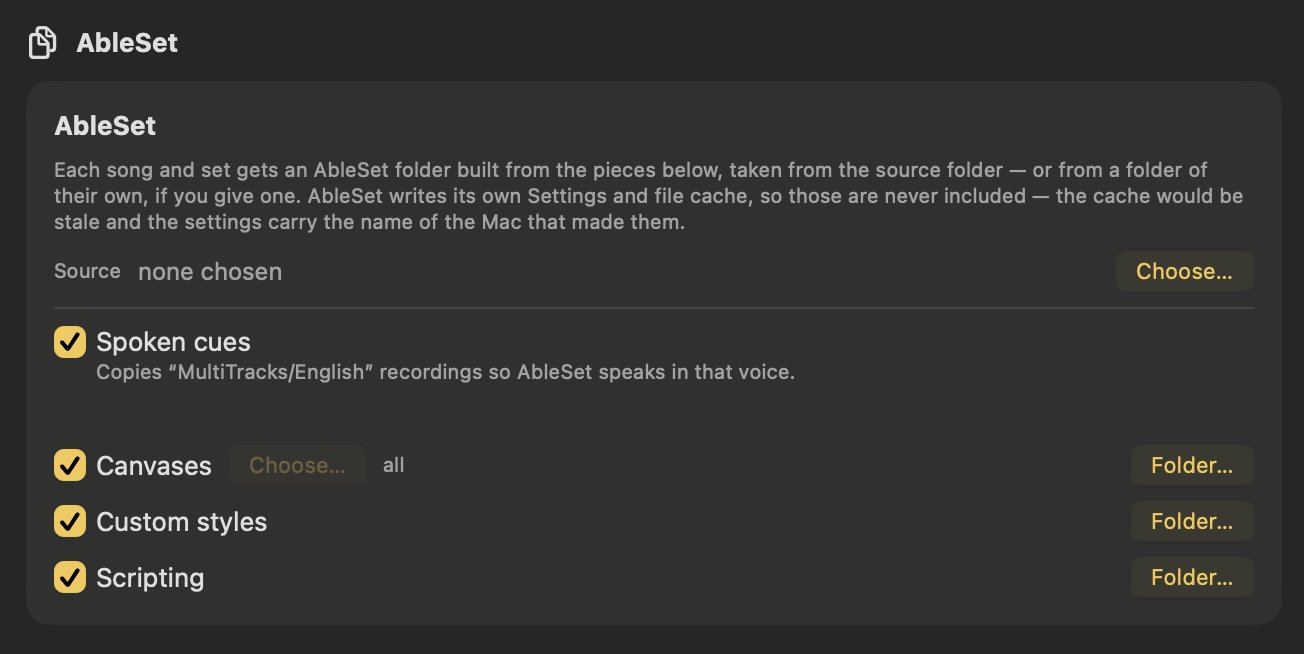 AbleSet: what travels into every project, spoken cues, canvases, styles and scripting.
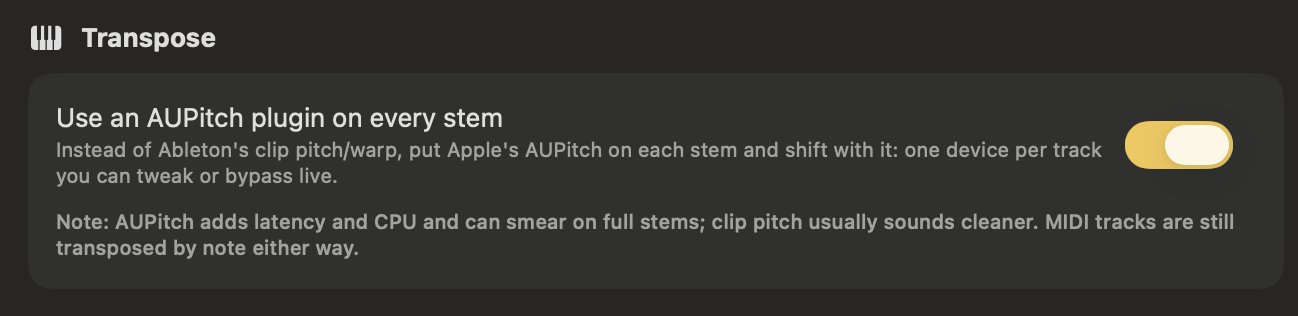 Transpose: an AUPitch on every stem instead of clip pitch.
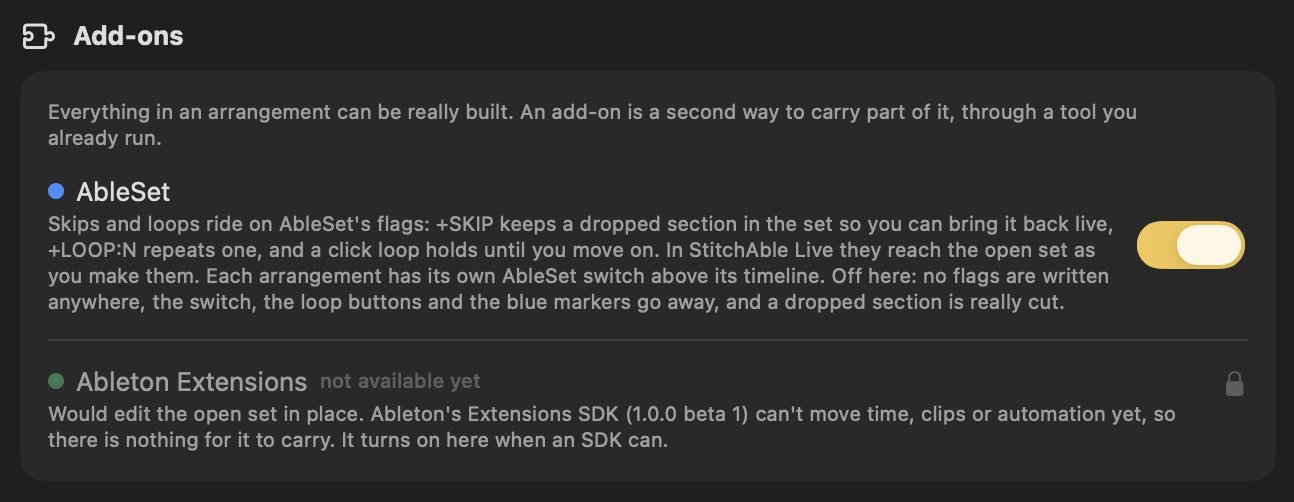 Add-ons: AbleSet on, Ableton Extensions waiting on its SDK.
 Layout: keep each song's own track colours.
Section 16
Trial and activation
StitchAble is free to download and build with. The trial is the whole app, not a crippled
version: every feature works, and the only limit is size.
- Build up to 30 sets.
- Up to 3 songs in each set.
- Everything else is unrestricted, including transitions, preview, transpose, click, guide, and Live 11 or 12 output.
When you are ready, buy a license and you get a key on your receipt.
- Paste the key into the activation screen.
- Press Activate. That is one online check on this Mac.
- After that StitchAble runs fully offline, with the caps lifted in the app you already have.
About StitchAble in the app menu says whether this copy is activated, or how many trial builds are left.
Nothing to reinstall. The key unlocks the copy you have been using,
so the sets you built during the trial stay exactly where they are. Each purchase includes 5 activations, and
if you are moving to a new Mac or need more seats, send me a message.
Section 17
Compatibility
StitchAble works with MultiTracks stem downloads and with Ableton-authored song projects, so your library can mix both.
It outputs a single gapless Live set, optionally a full Ableton project. The app is a macOS app, Developer-ID signed and Apple-notarized, so it opens with a normal double-click.
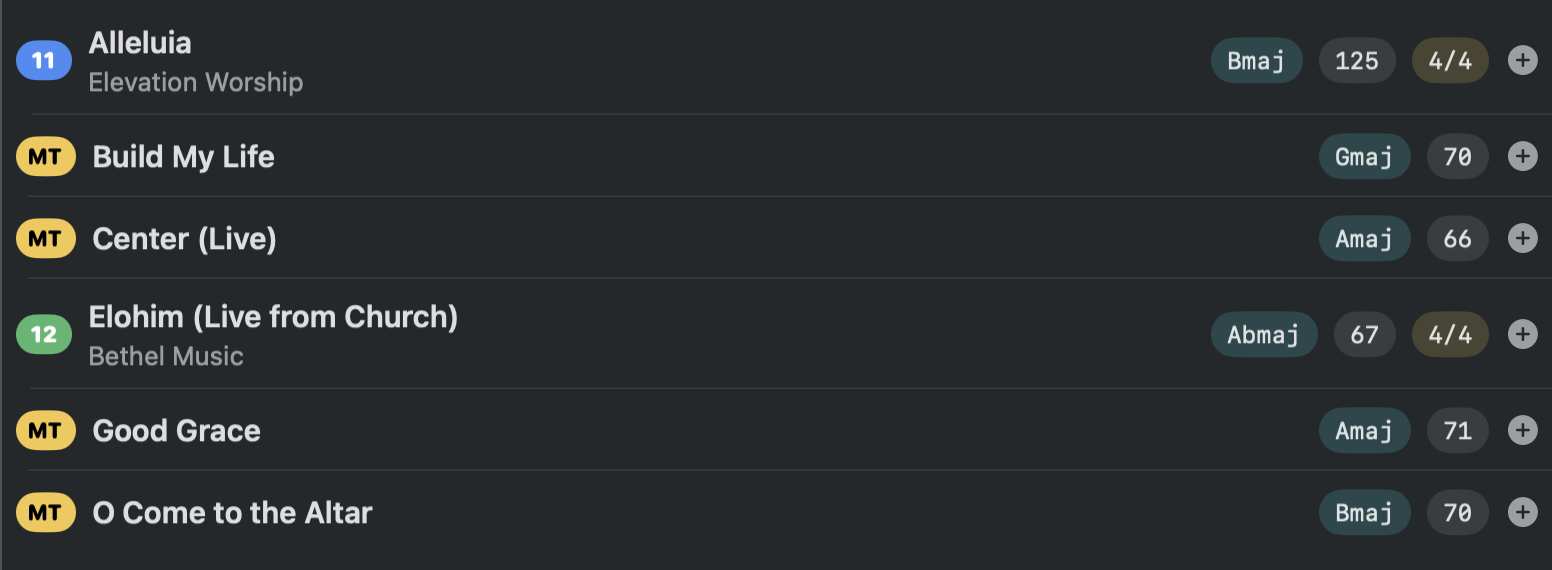 A MultiTracks download and an Ableton-authored song living side by side in the library.
Section 18
Staying up to date
StitchAble updates itself. You don't have to come back to the site to find out something changed.
- A version pill sits beside the title. It lights up when there is a new release: click it to check right now, or use StitchAble ▸ Check for Updates… in the menu.
- It also checks on its own a few seconds after launch, and tells you when something is there.
- Updates are signed, and they install once you approve them. Nothing installs behind your back.
Coming from 1.0.4 or earlier? Those builds shipped without the updater, so there is nothing in that copy to check with. Download the current version from the site once and drag it over, and every update after that arrives on its own. Your license and your sets are not touched: the activation on this Mac stays activated, and the sets you built stay exactly as they are.
Section 19
Tips
- Preview before you build. A two-second listen at each seam catches an awkward overlap or a wrong-key entrance before you ever open Live.
- Choose overlap length by feel. Two bars is a gentle wash between songs; more bars make a longer, more deliberate blend. Remember the count is in the outgoing song's bars.
- Transpose to build a set that flows. Small moves keep singers comfortable and let neighboring songs share a key without warping anything.
- Set your guide voice once. Choose the family you want in Settings and every set you build uses it, so this is a one-time decision unless your team changes languages.
Section 20
Troubleshooting
The usual snags and the fix for each.
The guide is silent, or one cue does not speak
Check that a guide voice is selected in Settings. A cue with no recording in that voice is left silent on purpose; add the pack that contains it with Add Pack…, or switch to a voice that includes it.
A count-in number says the wrong thing
Rebuild the set on 1.0.1 or later. Count-in number cues are matched to your installed voice automatically from that version on.
A stem is silent, or Live reports missing media
StitchAble merges what each song points at, and heals every click and guide sample to the pack in your User Library on build. A stem of the song itself that has gone missing has to be found in Ableton and the song saved, or the song rebuilt in BuildAble. Every repair StitchAble makes keeps one .als.bak beside the song.
A control track lane arrived in the set as two lanes
One song spells it differently. Press Review, open the Track Lanes page, rename the odd one inline and click Apply Renames, or use Merge with… to join the two without touching the file. An audio lane and a MIDI lane of the same name are a separate case and never merge, which is expected.
A song plays at the previous song's tempo
Rebuild on 1.0.4 or later. Tempo and meter now hand off cleanly at each song boundary.
Live crashes when opening a merged set
Rebuild on 1.0.4 or later. Sets merged from songs in different sessions no longer leave behind the references that caused this.
The folder you chose showed nothing
StitchAble now tells you when a folder holds no Ableton projects. It reads song folders, single folders, loose .als files, and flat folders of .als files, so if it found nothing there genuinely are no projects in there.
The Live button stays dark
Ableton has to be running with a set open, the bridge has to be installed (press Live; the panel offers to install it), and StitchAbleBridge has to be chosen as a Control Surface in that Live's own Settings under Link, Tempo & MIDI. Live 11 and Live 12 each need it chosen once.
Live mode says a song is not in the open set yet
It is in the running order but not in the set that is open. Build & Reapply, and it is.
Build says your template was saved by the other Live
A Live 12 file won't open in Live 11, and the set is built on your template. Switch the Live 11 / Live 12 chooser, or save your template in the Live the set is for and choose it again under Settings, Layout.
A move on the Template page went back
Those songs already have something on that track, and two parts of one song can't share one. The line at the top of the page says which. Click the chip to split it by song and move only the songs that can go.
Build & Open refuses: the chooser and the connected Live disagree
You are connected to one Live version with the other chosen. A Live 12 file will not open in Live 11, so pick the mode of the Live you are connected to, or connect to the other one.
Live 12 said a set was corrupt
Rebuild on 1.1.0 or later. A Live 11 song merged into a Live 12 set used to keep Live 11's clip-scale form and Live 12.4.6 refused the file.
A section edit says it needs Build & Reapply
Live, AbleSet can skip a section and loop one. A reorder, a repeat, a trim, a rename or a click loop moves audio, so it has to be built. Press Review and Build & Reapply; the set is rebuilt with every key, name and arrangement you set still in place.
Where the shared files live
Guide families, click sounds and artist initials are in your Ableton User Library under StitchCore, shared with BuildAble. The bridge is under Remote Scripts. Each song's card is <song>.stitchcore.json beside its .als when the song has a project folder of its own; a loose .als or a raw MultiTracks download keeps its card under StitchCore/Cards in the User Library instead, so nothing is dropped into its folder. The older .buildable.json name is still read.
The set opened in the wrong version of Live
Check the Live version target before building and pick the version you run on stage. A Live 12 file will not open in Live 11.
Still stuck? Send me a message. Tell me what the set was made of (Live 11, Live 12, MultiTracks) and what you had chosen in Settings, and that is usually enough to find it.